the torison spring on my microwave door broke. How do I get to this spring to replace it? thanks
You can get the catalog pdf from the mfr webpage http://shared.whirlpoolcorp.com/assets/pdfs/literature/Repair%20Part%20List%20-%208186458.pdf
or look up the part number on appliancepartspros.com and it will show you the exploded view. Mfr webpage has all the revisions.
yours P/N look like
16 4452396 RH (For SS MDL) heavy spring 4451009 medium weight
17 4452395 Spring,Torsion LH lightweight spring.
Alternately you if you keep breaking the LH (lightweight spring) you can replace both springs with the 4451009 medium weight spring which is used on several models which don’t offer the aluminum door (Meteorite) option which is why they have two RH springs in your production line. (to reduce parts on the production line)
UPDATE: I found out that if you put a drop of motor oil or other same weight oil on all the places where the spring goes through a metal hole or rubs on (when spring is new), that the spring will no longer break every year! Mine has lasted 5 years now without a change.
GO TO START OF 2ND PAGE (POST #12 FOR PICTURES)
- unplug the unit
- you need a Phillips screw drivers medium and large.
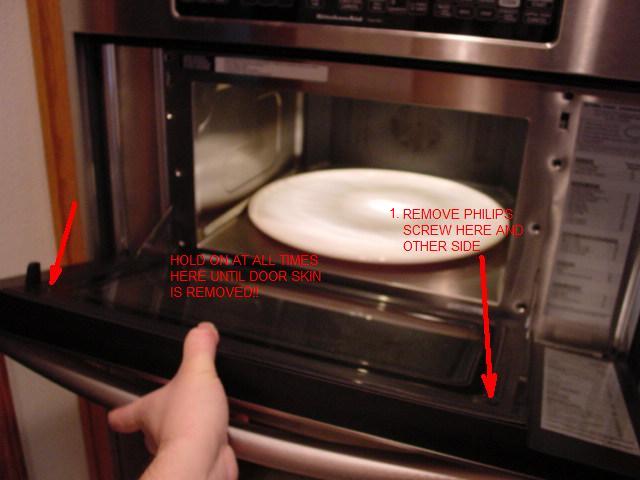
- Open door and hold onto the handle at all times firmly and remove two screws on the inside of the door near the top that are in recesses in the plastic door frame inner.
- Pull door handle outward away from the hinge ends and it will come loose from the brackets at the bottom. Put door outer somewhere safe.
- close remaining door attached to oven after you have removed the two screws you just took out.
- remove 4 screws from the vent at the bottom of the microwave and remove the vent.
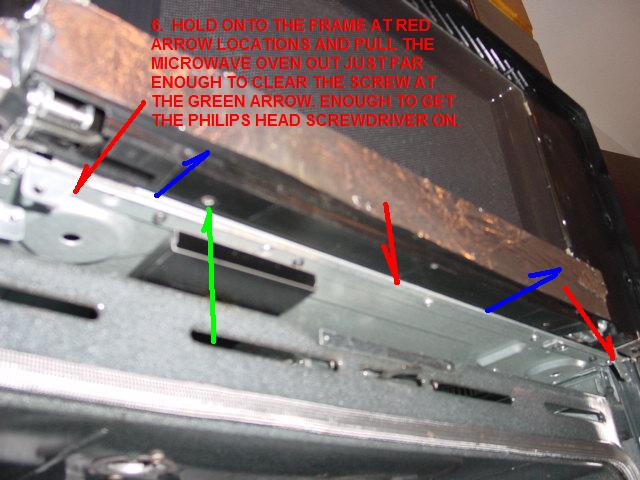
- Remove the two screws under vent that hold the microwave to the oven frame. They go through the brackets marked #4 on the diagram.
- Wiggle out the microwave just far enough to clear the screw on the bottom of the door that is blocked by the oven vent. (about 1 inch)
- Remove two screws from bottom of microwave door that hold on the plastic door frame marked #2 on the diagram.
- Open the door carefully.
- You can now remove the Plastic door frame #2
- Close the door again.
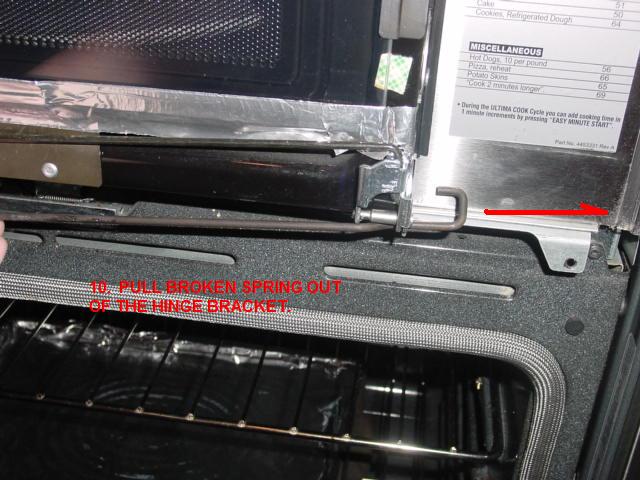
- The torsion springs (whats left of them) are at the bottom and criss cross attaching to the left and right Door hinge.
- I don’t have any pictures but the springs are identical just one has the end with most bends at the left and the other has the most bends at the right. Hopefully only one broke so you can see how it goes through the hinges. Just put the other one on exactly opposite.
- At the center where the springs intersect, put a baggy tie rap to hold the two springs together lightly or use aluminum speed tape. This stabilizes the springs and helps not to damage the door next time they break.
- Good Luck

Pictures now at post #12
thanks very much for the detailed instructions. I was able to replace the single spring that was broken with no problems. I appreciate your help.
Your welcome, Today I added more info above after I have talked to many people. Your model has the lightweight RH spring and heavy LH spring. If you have problems again and the lightweight spring (or heavy) keeps breaking you can switch both to a medium spring weight.
Well after days of talking with Kitchenaid and Whirlpool this door spring problem is huge. You should tie the two springs together with a tie rap because when they break they almost always break the outer door assy glass, which is over $150 bucks to replace.
All these Kitchenaid Whirlpool models have the same design problems.
Now on to the above mentioned microwave door problem. They have known they have a problem with the spring breaking from within 3 months to at max limit is about 3 years. When they break they most often hit the outer glass which breaks then or later after heat cycling. They have changed the spring number several times over the years and models and the stainless exterior finish models the most. Lots of different tensions and models due to the stainless door is heavier and the brushed aluminum door models is lighter with the white,black and bisket colors being different again.
on a side note,
Trying to get more options out of the same amp draw (for home upgrades without rewiring for higher amp circuit) The oven broiler is very low powered. They try to do a sales rename to make it sound positive by calling it “closed door broiling” but in fact if you broil with low temp with the door closed its NOT broiling but in fact a boiling affect not even a roast or bake which brings out a liver taste in the meat. You also don’t get crispy fat and can never get a rare cook.
Hello. Both our spirngs broke and I am now struggling wih how the new springs go. The pdf picture doesn’t really help. Does anyone have a picture that is more definitive? Happy New Year!
I replaced a torsion spring 4452396 in a KitchenAid microwave. It lasted for about a year. Has anyone tried what is described as a heavier torsion spring?
Hello, I followed your instructions and successfully replaced both of my torsion springs. I want to point out a serious safety problem with the door. [COLOR=red]CAUTION!:eek: [/COLOR]
When I went to remove the two screws that hold the outer panel and handle, they both went flying downward and landed on my foot. Luckily the glass did not break but a very sharp edge caught me on my leg and caused a deep cut. Ouch!:mad:
The second safety issue is related. When I bolted the same panel back, I ended up stripping the threads on the screws. This is a really bad situation because if someone unknowingly strips the threads and returns the microwave back to their spouses, I could see that same panel and handle flying off and hurting someone! I went to Home Depot and bought two speed nut clips and attached them to the bar that holds the handle to the panel. Size #6.32.
Enough on that. I was not able to slide the microwave out to clear the vent. The left side would come out about an inch but the right side wouldnot give one bit. I ended up forcing my screwdriver on the vent and bent it a bit. :o
Well my new spring lasted almost exactly one year then broke again. Called Kitchen Aid and told them im on my 4th spring. Seems to break about at 6000 door openings. I average about 20 door openings a day.
They seem to think the right spring is too thick thats why it keeps failing. They said instead of using the one thick 4452396 (right) and one thin 4452395 (left) to replace both with the medium strength spring which is in they parts book as 4451009, it is cheaper also.
They said they would send me them free since I have had so many problems with them.
When I get the new parts I will take pictures and post how the springs go on.
Jorge8850 I see you didn’t read instruction 3 very well it says “Hold door handle at all times”, That was said so you dont drop the door outer (with glass) on your foot. ![]()
Good stuff, evo! Made it a “sticky”.
Well still waiting for the recommendation on springs from Kitchen Aid so I replaced the spring with the original number 4452396 RH SS models.
Follow the instructions with the pictures the reverse to reassemble.
UPDATE: I found out that if you put a drop of motor oil or other same weight oil on all the places where the spring goes through a metal hole or rubs on (when spring is new), that the spring will no longer break every year! After replacing 4 years in a row after the 5th spring replacement with oil it has lasted 5 years and still has not broke again. If the spring rubs on the holes and gets any sort of a scratch it will produce a stress riser and that is where it breaks.
DSC03770.JPG (31.8 KB)
DSC03771.JPG (42.4 KB)
DSC03772.JPG (63.9 KB)
DSC03773.JPG (60.1 KB)
DSC03774.JPG (60.2 KB)
DSC03775.JPG (50.0 KB)
DSC03776.JPG (45.7 KB)
DSC03777.JPG (53.3 KB)
DSC03778.JPG (60.5 KB)
DSC03779.JPG (56.3 KB)
DSC03780.JPG (46.6 KB)
DSC03781.JPG (35.7 KB)
DSC03782.JPG (38.1 KB)
DSC03783.JPG (50.2 KB)
DSC03784.JPG (55.6 KB)
DSC03785.JPG (42.2 KB)
DSC03786.JPG (60.4 KB)
DSC03787.JPG (34.4 KB)
I HAVE THE SEPERATE, BUILT IN MICRO, WHICH IS NOT ATTACHED TO THE OVEN. SOME OF THE STEPS HAVE TO BE DIFFERENT SINCE, I AM NOT DEALING WITH THE OVEN. ANY TIPS???![]()
![]()
ok so both my springs on my SS microwave are broken. i ordered 2 4451009 medium weight spring to replace them as instructed. the first went in perfect as shown on the detail directions and pictures (thanks for the details!!!). the second does not seem to work unless you recommend twisting one end 180 degrees. is there a left and right option for the 4451009 medium weight spring? thanks in advance for you help…
I just finished replacing the broken spring on our KBHC109JSS KithchenAid. This is a stand alone stainless steel unit.
Tools needed:
Stubby Phillips.
Angled screwdriver which can work in tight space
http://www.wilsoncombat.com/a_tools_…crewdriver.asp
Harborfreight sells an equivalent drive for cheap.
-
Swing open the door. Locate 2 screws on the side of the frame. The head gets exposed on the sides once the door is opened up. (use stubby phillips). Slide down and swing out the trim pieces.
-
Undo the 2 screws that hold the bottom trim piece of the microwave frame. The screws are on the side.
-
Keep the door open and undo 2 screws that hold the front door. [top portion of the door from inside.] Hold on to the door-skin and pull it up and out. [pic 1 from evo]
-
Once the skin is removed, it will expose a plastic shell. Fold the attached part of the door in close position. Dont need to latch it closed. Locate the 2 screws that hold the plastic shell and undo them using the low clearance angled screw driver. … Look up from below. On my model there are 2 stainless steel “U” pieces that hold the bottom of the door skin. You dont have to remove them form the plastic shell. [pic 7 from evo. there is no metal shielding and you will see black colored plastic]
-
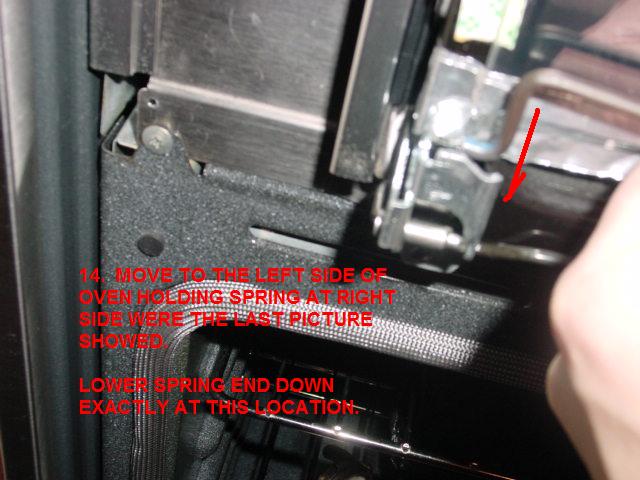
With the plastic shell removed, the torsion spring(s) can be replaced. Once you thread the new spring in, it will take a bit of patience to snap the end in place.
-
Re-assembly is reverse 5 -1
Note: You dont need to detatch the microwave out of the cabinet.
Caution: If you have the stainless steel, the bottom of the door can be very sharp.
Correction of previous post:[B] Left and Right springs are NOT interchangeable. You can not use the higher tension right for the left spring.
[/B] Salim
I have the same problem with my KitchenAid stainless steel microwave/oven combo (Model YKEMC308KM01). It has already been replaced under extended warranty but broken again one year later. Before I take it apart, does the medium weight 4451009 spring replace the original right (4452396) or original left (4452395) spring? Has anyone used the recomended alternate medium weight to replcace both?..if so, how?
Thank you.
Great thread Evo!!! My RH torsion spring was the culprit, went to Whirpools site to order the part at $50.00 bucks…founds this site offering the same part for $25
Part Details - WHIRLPOOL Spring, torsion ( right hand) Blue Tip, part number: AP3082257
Thanks again for your help!!![]()
BIG thanks for the great info/pics Evo! We replaced our springs and now the door is perfect again! Your post was a great help. Thanks again.
[FONT=Arial]I just finished changing the RH torsion spring on my KitchenAid stainless steel microwave/oven combo (Model KEMS308GSS) for the fifth time (9/02, 3/05, 2/07, 3/08 and 5/09). This unit was installed in my kitchen in 3/01. I have always replaced the spring with the production unit (4452396). This time I installed the medium spring (4451009) based on the information from this forum. Unfortunately the door is heavier to use now, but if I never have to replace that spring again it will be worth it. I expect the medium spring will last as long as the LH spring (4452395) which has never broken, since the diameters are so close (Med RH: 0.142”, LH: 0.139”). The diameter of the heavy RH production spring is 0.156”. [/FONT]
[FONT=Arial]A few comments about installation:[/FONT][LIST]
- [FONT=Arial]The first step when replacing these springs is to remove the microwave door. This door is only held on by two screws. If you don’t hang onto the door when you take these screws out, significant damage will occur (see earlier posts by others). I learned this the hard way the first time I did it.[/FONT]
- [FONT=Arial]I find this job easier if the oven door is removed. This is a one minute job if you use a Hinge Pin Kit (814381) which can be purchased from this web site. See step 2 in the microwave/oven combo installation instructions for the oven door removal procedure.[/FONT]
- [FONT=Arial]The oven exhaust vent that blocks the removal of the left screw on the bottom of the plastic microwave door frame can be “unhooked” from the attachment screw located inside the vent by lifting the vent while pushing in on the vent and pulling out on the front oven frame. The attachment screw holding the vent to the frame goes through an oblong hole in the bottom of the vent. Once the vent is unhooked, it can be moved to the side to access the left screw. Wear gloves, its sharp and watch out for the electrical wires to the right of the vent. [/FONT][/LIST]
[FONT=Arial]Many thanks to Appliance Parts Pros.com for supporting this forum and for producing a user-friendly web site.[/FONT]
Thanks to evo for the original detailed instructions and to Toddt for instructions on my exact model number. Since I also had the lower oven door not closing completely problem as described in other threads, I took Toddt’s advice about removing lower oven door to make the torsion spring replacement job easier. While the lower door was off I replaced both hinges/springs. So, in the space of a couple of hours I got my microwave door fixed and my lower oven door fixed as well.
Only glitch in the process was that my microwave would not wiggle out far enough to get to the screw above the oven vent tube. Tried and tried and finally wound up hacksawing the head off the screw just inside the vent tube so that I could move the vent tube to the right just far enough to get to the screw.
Double victory day!
Thank you!!! I followed evo’s instructions and they worked perfectly. You made it so easy even this non-handy stay-at-home mom was able to replace the spring during my kids’ naptime. I’m feeling pretty proud of myself!