Hi Dick, I hope you get this. I’ve ordered the bearings, o-ring and tub seal per your suggestion and will post once I’ve started disassembly.
A
Hi Dick, I hope you get this. I’ve ordered the bearings, o-ring and tub seal per your suggestion and will post once I’ve started disassembly.
A
[COLOR=red][FONT=Cambria]Follow all safety warnings in the Service Manual and remove 120VAC power to the washer before working on the machine.[/FONT] [/COLOR]
Hey Andy,
Remember to remove the Tumblers you will need a #20 TORX driver 6” to 8” should do it. I just put my #20 TORX driver bit on a ¼” socket extension. Follow the SM to get down to removing the six spinner bolts.
The six Spinner bolts will be corroded in. Give them a good wash/soak with PB Blaster overnight. As I mentioned in the Maytag Neptune load unbalance post I sheared one off with my ½” impact tool and that made the job a bit more painful. Other folks I have worked with had no issues.
1st pic of looking into the inner tub of the clamping ring and six Spinner Bolt locations. 2nd pic of 5 Spinner bolts and one sheared off bolt.
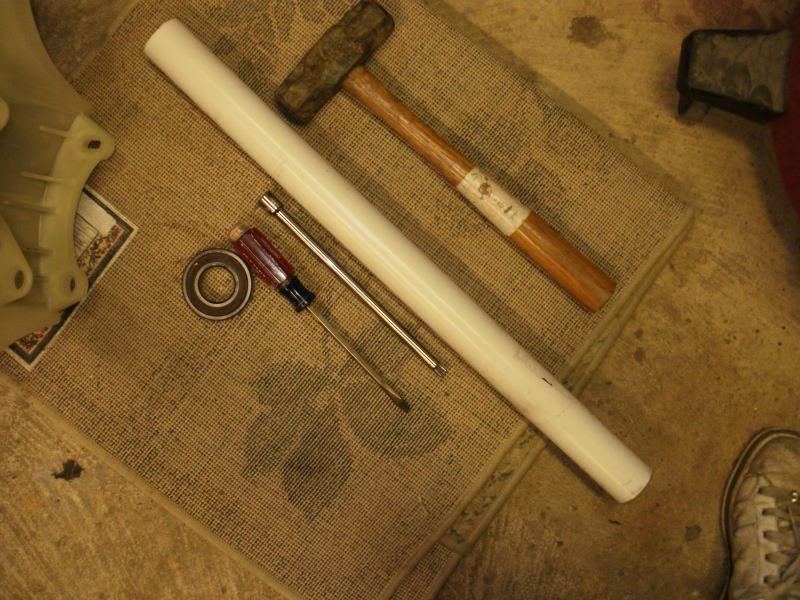
My bearing extraction tools are plain vanilla as you will see in the 3rd pic.
I flipped the Outer Tub upside down on a piece of carpet and with a large screwdriver/socket extension I started to pound out the upper bearing first. A 3/8” dia piece of drill rod would probably work better.
You will see a floating spacer between the original 6207-DU bearings 4th and 5th pics. You need to work around the inside of the spacer as you pound out that first bearing.
Once I got that first bearing out I laid the outer tub on its side and took a piece 1” PVC about 3’ long (that’s all I had on hand) and my 2.5lb hammer and with careful strikes punched out the bottom 6207-DU bearing. A helper would be handy to have during this process to help control tub movement.
Take care thru the process with the hammer strikes that you don’t have a hammer blow glance and strike the tub. Take care with the molded in Drive Motor bracket that you cause no damage to it when working on this project.
Once the bearings are out I wire brushed bearing hubs in the tub to remove rust as best I could.
If other Forum members/ART’s have suggestions please jump in.
I laid out a drawing for local machine shop for home brew bearing insertion tool start/seat the bearings. I ended up using that for just starting to seat the bearings you won’t need anything like that. A forum member I worked with went to Auto Zone and rented a bearing seating tool that is worth exploring.
I placed some large washers over the bearings to protect the races and with careful 2.5lb hammer blows seated the bearings. Don’t forget after seating the 1st bearing insert that spacer. I did…not fun ):
Will post some additional pics of the installed 6207-2RS in the Outer Tub.
Let me know how many coins you find in the tub. I have a Sump Cap filter I came up with if you are interested. It will help protect the Drain Pump impeller from any coins that get past the Sump Cap as well as other debris/crap.
Next post if no other questions I will go over a tip for installing the Tub Seal…….Dick
Wash Basket removed Spinner Plate.JPG (44.4 KB)
Spinner Plate with Wash Basket bolts I broke off one. 2.JPG (61.5 KB)
Bearing extraction tools.JPG (93.5 KB)
Outer Tub Beaings bottom 1.JPG (47.1 KB)
One of two NSK 6207 DU bearing and spacer.JPG (34.2 KB)
Andy,
When you pull the Spinner Assembly out 9.999 times out of 10 the sleeve that is in the old tub seal will remain on the Spinner Support shaft. I show small drill bit pointing to it and the process of removing it.
You will throw that old sleeve away… [SIZE=3][COLOR=#000000][FONT=Calibri][COLOR=red]do not reuse[/COLOR] [/FONT][/COLOR][/SIZE]. You will have a new sleeve installed in your new Tub Seal.
When you pull out the Spinner Support I would clean up and re-grease the cage needle bearing (Clutch Pulley end) the agitator shaft rides in just as a preventive maintenance step. That bearing can be replaced I have done so just for the hands on as well as the upper Spinner Support bearing that the splined agitator shaft end rides in. Those bearings are pictured below.
I’m no expert at this so if any of the process is not clear let me know…Dick
1 Drill bit pointing to sleve.JPG (50.9 KB)
4 Work you way around the sleeve prying up.JPG (46.4 KB)
5 We have lift off.JPG (54.1 KB)
Agitator Shaft removed showing roller bearing cup Clutch Pulley end.JPG (54.5 KB)
Agitator bearings.jpg (11.2 KB)
Just some pics from a Tranny and Spinner support I picked up real cheap.
The install pic mentions to greese the spinner support on install just a fyi.
Spinner Support Plate 2.jpg (69.7 KB)
Agitator shaft.JPG (49.1 KB)
Agitator Shaft Spline.JPG (34.2 KB)
Spinner and Agitator Shaft seated.JPG (57.0 KB)
Transmission mounted to Spinner plate.JPG (48.8 KB)
I believe I may have to replace the tub seal because I took clutch off to do the clean up suggested but found both bearings rusted stuck and the rust seems to have started above the clutch like the tub seal is starting to leak. It yanked the pin from the spring but did not break the spring in clutch. I tried taking all the needles out of bearings and soaking everything in wd-40 for a couple of days and then soaking in oil and reassembling but still had to beat one bearing on and its locked up. Maybe I can buy the clutch without the pulley and spring? I think the new one will go bad if I don’t fix the leak though. I don’t know the series yet because I’m working on it where its installed. I will try to pull it out and look with a mirror. It is the FAV6800aaw. I originally started taking it apart and searching for answers because of the unbalanced problem. I appreciate any advice you might have. :eek:
dnmll
[COLOR=red][FONT=Cambria]Follow all safety warnings in the Service Manual and remove 120VAC power to the washer before working on the machine.[/FONT] [/COLOR]
I feel from what you described a Tub Seal and Tranny O-Ring replacement is called for.
I have a few questions;
When you removed the Clutch Pulley it sounds like your series used the Upper One-Way Bearing mounted on top of the Clutch Pulley “”found both bearings rusted stuck””. If so then I feel you have a Series 10 or 11 machine designated by the first digits of your machines S/N. You can check that out on the right rear Console Model I.D. tag.
With the Clutch Pulley and Upper One-Way Bearing mounted on top of the Clutch Pulley removed the Wash Basket can be spun either CCW normal spin cycle direction or CW. With the Clutch Pulley and Upper Bearing ring mounted the Wash Basket should never rotate CW.
Thru the lid can you spin the Wash Basket CCW as fast as you can by hand? The Wash basket should turn CCW several revolutions and come to a gentle stop. Does it and do you hear any bearing noise? Just checking the health of the Outer Tub bearings.
Let’s see what you find and we will proceed. I’m an owner like you and have done a complete Outer Tub rebuild including Spinner Support bearings but I’m no expert… but have a good DIY feel for the machine and will try to help you get the machine back in service with resonable cost of repair, that’s the goal. I assume you can tollerate some down time?
“”Maybe I can buy the clutch without the pulley and spring?””
I believe this Clutch Pulley and Upper bearing ring use a HF3520 One-Way Needle clutches type bearing. I bought one and was going to try pressing into the Clutch Pulley hub if I ever come across one in a junk pile.
You can’t buy the SS large wrap spring that I’m aware of. Most DIY folks I have worked with on different forums re-bend the ends to shape and give it a try. No feedback on long term service results. There two different p/n numbers for the Clutch Pulley I know the cheaper one by ½ price is this p/n 25001169.
“”I think the new one will go bad if I don’t fix the leak though.””
Yes right on…….…….Dick
Parts;
Qty 1 Tub Seal AP4035323
Qty 1 O-ring seal AP4034167
If you need to replace the Outer Tub Bearings;
Qty 2 6207-2RS Bearing 35x72x17 other series machines that do not use the Upper One-Way bearing ring need special attention to the Lower Outer Tub Bearing used.
The Clutch Pulley I recommend for all FAV6800A/FAV9800A series is p/n 25001169.
[QUOTE=dh1200s;344485]dnmll
[COLOR=red][FONT=Cambria]Follow all safety warnings in the Service Manual and remove 120VAC power to the washer before working on the machine.[/FONT] [/COLOR]
I feel from what you described a Tub Seal and Tranny O-Ring replacement is called for.
I have a few questions;
When you removed the Clutch Pulley it sounds like your series used the Upper One-Way Bearing mounted on top of the Clutch Pulley “”found both bearings rusted stuck””. If so then I feel you have a Series 10 or 11 machine designated by the first digits of your machines S/N. You can check that out on the right rear Console Model I.D. tag.
With the Clutch Pulley and Upper One-Way Bearing mounted on top of the Clutch Pulley removed the Wash Basket can be spun either CCW normal spin cycle direction or CW. With the Clutch Pulley and Upper Bearing ring mounted the Wash Basket should never rotate CW.
Thru the lid can you spin the Wash Basket CCW as fast as you can by hand? The Wash basket should turn CCW several revolutions and come to a gentle stop. Does it and do you hear any bearing noise? Just checking the health of the Outer Tub bearings.
Let’s see what you find and we will proceed. I’m an owner like you and have done a complete Outer Tub rebuild including Spinner Support bearings but I’m no expert… but have a good DIY feel for the machine and will try to help you get the machine back in service with resonable cost of repair, that’s the goal. I assume you can tollerate some down time?
“”Maybe I can buy the clutch without the pulley and spring?””
I believe this Clutch Pulley and Upper bearing ring use a HF3520 One-Way Needle clutches type bearing. I bought one and was going to try pressing into the Clutch Pulley hub if I ever come across one in a junk pile.
You can’t buy the SS large wrap spring that I’m aware of. Most DIY folks I have worked with on different forums re-bend the ends to shape and give it a try. No feedback on long term service results. There two different p/n numbers for the Clutch Pulley I know the cheaper one by ½ price is this p/n 25001169.
“”I think the new one will go bad if I don’t fix the leak though.””
Yes right on…….…….Dick
Parts;
Qty 1 Tub Seal AP4035323
Qty 1 O-ring seal AP4034167
If you need to replace the Outer Tub Bearings;
Qty 2 6207-2RS Bearing 35x72x17 Sealed (note can be used for Series 12 thru 17 but requires some mod).
Clutch Pulley all FAV6800A/FAV9800A series I prefer 25001169 look for best price.[/QUOTE]
Thanks for your quick response.
I saw 2 different part numbers for clutch and thought maybe one was cheaper because it didn’t include the pulley or something.
Your Outer Tub Bearings seem good.
Tub Seal and tranny O-ring and Clutch Pulley will get you back in svr.
I Google and I find the SM with this phrase; 16022808.pdf
Check thru a couple of the hits.
Can you e-mail me and will help with the SM and Clutch?
My e-mail adr is attached to Vcard on my profile…Dick
Well I disassembled the washer. I unplugged it first. I pulled away from the wall a few inches so I could lean the top back. I removed the front panel, unplugged the motor, disconnected the drain hose from wash tub, undid the wire hangers from rear of tub (Just lift tub up and push hanger out), took balance sensor off wash tub, and pulled tub straight up to disconnect front struts. I then took the tub to the garage to disassemble the rest.
I pried the two covers off agitators and then removed 2 Torx 20 screws and removed the agitators. Removed the rest of the torx screws to remove most of the inside plastics for cleaning. (They were covered underneath with scum and black mold.) I removed four bolts holding the transmission and gently pried back and forth while tub was tilted on its side and removed the tranny. Lots more black mold, soap, and dirt.
I turned wash tub upside down. I used a 1 3/4"socket and impact to remove the nut. Turn tub upright and removed 6 bolts to remove the spinner support shaft. I then had to pry the tub seal sleeve off shaft like Dick said. There was rust on bottom of wash tub and on top of spinner support shaft. No evidence of water inside of transmission so it looks like water was leaking through the o-ring and going down the center of the spinner support shaft. I think the main bearings are ok.
I am wondering if I should change the small bearing on support shaft??? Not sure how to remove it. I will have to order tub seal, O-ring for transmission, clutch, and maybe the small bearing. I’m wondering if it is worth putting new tub bearings in while I have everything apart. Other than that, nothing hard so far but lots of cleaning to do.
Good job on the tear down Mike. When I tore down my Series 10 same deal lots of mold.
As for the bearings the INA–SCE 910 Clutch Pulley end of the Spinner Support. I punched it out it and tapped in the replacement with a bushing I had that was about the same dia as the outside race of the SCE-910. I drove out the upper 6002-DU bearing first.
I would clean up the SCE-910 caged needle bearing with WD-40 and see how it looks. Once cleaned up see if the agitator shaft spins in it and the upper 6002-DU bearing OK. I did it just for the hands on and I’m sure it was over kill for my re-build.
I lubed the SCE-910 caged needle bearing with some water proof lithium grease I used on my boat trailer hubs. Maybe someone on the forum could recommend a good water proof lithium grease to re-lube that bearing.
As far as the Outer Tub Bearings if the Spinner Support spun in them OK I would let them go but that’s your call. As you mentioned you’re at the point where you could punch them out now and drive in a new set and be done with it.
Hi I noticed on the outside of the outer tub down low there appears to be 2 holes (one on each side) maybe weep holes? It looks like some rusty water dripped down both of them but I’m not sure what they are or whether it dripped while cleaning. Do I just tap the shaft on the square (clutch side) to get to the bearing? Right now the shaft is still in the support. Thanks again.
Yep you have the Spinner Support out on the work bench. You can pull the agitator shaft out of the Spinner Support from the splined end.
Maybe a couple gentle taps with a wood or plastic mallet at the squared end and it should come right out. I’m sure the agitator shaft will be nasty. I hope no rust on the cagend needle bearing squared end side.
““Hi I noticed on the outside of the outer tub down low there appears to be 2 holes (one on each side) maybe weep holes? It looks like some rusty water dripped down both of them but I’m not sure what they are or whether it dripped while cleaning.””
Not sure… let me look thru my pics and see if I can ID. Do you have a pic?
Going to bed shortly will follow up.
OK so I took the spinner shaft out and it doesn’t look too bad but I want to change the bearings anyways while I’m at it. What’s a few more dollars? When I took the tub seal out it had lots of rust under it and the rubber seal was hard. So I think both the tub seal and trans o-ring were bad. The upper tub bearing was covered in rust so I tapped both bearings out for replacement. I removed the rubber seal from the upper bearing to see what it looked like and water was dripping out. It still had blue grease and no rust inside so maybe it would have lasted awhile but for less than $20 I figured why not just rebuild it. I ordered the clutch, o-ring, and tub seal today and I will order the bearings later when I get home. I need to get all the part#s together. Thanks again I couldn’t have gotten all this done without Dicks help. I took pictures and will post later. Mike
Upon further inspection it looks like the holes may be vent holes for wash tub bearings. This might be a good place to look while it’s in service to see if it’s leaking with out removing anything but the front panel. If you see water or rust dripping from holes it means water has gotten below the tub seal. I think if you remove the clutch and see rust you will have to replace the tub seal and o-ring or it will ruin the new clutch again in short order.
Here are some pictures from the disassembly.
[ATTACH]2641[/ATTACH]
[ATTACH]2642[/ATTACH]
[ATTACH]2643[/ATTACH]
[ATTACH]2644[/ATTACH]
[ATTACH]2645[/ATTACH]
[ATTACH]2646[/ATTACH]
[ATTACH]2647[/ATTACH]
[ATTACH]2648[/ATTACH]
[ATTACH]2649[/ATTACH]
[ATTACH]2650[/ATTACH]
100_2620.JPG (18.7 KB)
100_2621.JPG (23.7 KB)
100_2626.JPG (22.0 KB)
100_2627.JPG (17.4 KB)
100_2628.JPG (22.0 KB)
100_2629.JPG (18.9 KB)
100_2630.JPG (21.4 KB)
100_2631.JPG (19.0 KB)
100_2634.JPG (27.6 KB)
100_2638.JPG (12.3 KB)
[attach]2651[/attach]
[attach]2652[/attach]
[attach]2653[/attach]
[attach]2654[/attach]
100_2639.JPG (16.6 KB)
100_2646.JPG (12.8 KB)
100_2647.JPG (20.2 KB)
100_2648.JPG (15.7 KB)
The last picture in the first group shows the rust coming out of the hole on the outside of outer washtub just above the bottom.
Mike,
Are you going to replace the Spinner Support bearings? I see some rust ont the agitator shaft end. How did the caged bearing look in the Spinner Support at the Clutch Pulley end?
Excellent pics!
Check back in after work tonight and take a good look at your project…Dick
Yes I ordered all four bearings tonight. The shaft had rust on it but the bearing still had black grease with no signs of rust but we decided to just rebuild everything while it was apart. I guess it could be a week or so for the parts so I will be cleaning parts in the mean time. I also have some rust on the door and the edges of the bleach and softener ports so I’m going to wire brush and touch up paint. The project isn’t very difficult with the right tools but time consuming.