Rank: Member
Groups: Registered
Joined: 7/19/2010(UTC)
Posts: 6
|
I have a Kenmore 110.48722791 portable (apartment) washer that has been overfilling. Turns out that the tube for the fill level pressure sensor kept coming loose from the nipple on the control panel shield, so the previous owner had glued it on -- but the added stress caused the nipple to crack and thus leak. So I'm going to buy a new shield and tube, but is there a clamp that's supposed to keep the tube attached? Also, is the tube supposed to detach from the basin easily? I've pulled on it as hard as I was sure wouldn't break it and it didn't budge. There doesn't seem to be a clamp, but it's quite difficult to see in there. (Is there a way to access that area without taking the sides apart?) Probably the root cause is that the machine stops very hard when it finishes spinning. Is the brake supposed to be so strong? And it seems the previous owner also disconnected the snubber straps; any ideas why or should I just reconnect them? btw, I couldn't find the manual for this washer online. There's an electronics-heavy service manual inside; if anybody needs a copy, email me and I can try to scan it. Thanks, -Ken
|
|
|
|
|
|
Rank: Advanced Member
Groups: Moderators
Joined: 7/14/2010(UTC)
Posts: 5,222
Was thanked: 1 time(s) in 1 post(s)
|
Originally Posted by: kcarnold  I have a Kenmore 110.48722791 portable (apartment) washer that has been overfilling. Turns out that the tube for the fill level pressure sensor kept coming loose from the nipple on the control panel shield, so the previous owner had glued it on -- but the added stress caused the nipple to crack and thus leak. So I'm going to buy a new shield and tube, but is there a clamp that's supposed to keep the tube attached? Also, is the tube supposed to detach from the basin easily? I've pulled on it as hard as I was sure wouldn't break it and it didn't budge. There doesn't seem to be a clamp, but it's quite difficult to see in there. (Is there a way to access that area without taking the sides apart?) Probably the root cause is that the machine stops very hard when it finishes spinning. Is the brake supposed to be so strong? And it seems the previous owner also disconnected the snubber straps; any ideas why or should I just reconnect them? btw, I couldn't find the manual for this washer online. There's an electronics-heavy service manual inside; if anybody needs a copy, email me and I can try to scan it. Thanks, -Ken I will attempt to answer your questions as best I can at this point.I too have a problem finding the service manual, at this time. No there are no clamps on the air dome hose at either end (Tub connection or switch). This is a pressure fit and does not normally require a clamp. I have, on occasion used a short length of small wire to secure the tube to the fittings (like a wire tie on a loaf of bread or vegetable bag). Most technicians access the air dome hose attachment at the tub from the top of the machine. Otherwise you would need to remove the cabinet. No the tub should not stop suddenly, it should rotate 2 to 3 times slowly before the tub actually stops and locks in place. This indicates a problem in the brake system, it may need to be cleaned, lubed or most likely replaced. Yes, you should re install the snubber straps. Why the previous owner removed or disconnected them is only a guess. But the tight brake and the disconnected snubber straps would account for the air tube coming off. This situation would allow the tub assembly to over rotate when stopping or with an off balanced load, and probably why the previous owner glued them on. I hope these explanations have been some help to you
|
|
|
|
|
|
Rank: Member
Groups: Registered
Joined: 7/19/2010(UTC)
Posts: 6
|
Indeed that was very helpful. How would you recommend I access the brake system? Should I just flip the whole thing upside down? The service manual I found inside doesn't cover much below the control unit.
|
|
|
|
|
|
Rank: Advanced Member
Groups: Moderators
Joined: 7/14/2010(UTC)
Posts: 5,222
Was thanked: 1 time(s) in 1 post(s)
|
Originally Posted by: kcarnold Indeed that was very helpful. How would you recommend I access the brake system? Should I just flip the whole thing upside down? The service manual I found inside doesn't cover much below the control unit. You will need to access the brake assembly from the back access panel. Turning the unit upside down, probably wont get you access to the components you're interested in. Mounted to the base of the unit you should find a solenoid assembly with linkage to the brake asembly which encompasses the bottom of the gear case assembly. You would then need to adjust the linkage and check for excessive wear , damage and proper operation of the solenoid. For more indepth information you may want to contact SEARS for a service manual for this particular unit. My information is somewhat limited on older units.
|
|
|
|
|
|
Rank: Member
Groups: Registered
Joined: 7/19/2010(UTC)
Posts: 6
|
Thanks! I'm increasingly suspecting brakes, because on closer inspection the snubber straps were broken, not disconnected. The solenoid and linkage look and feel fine; I'd have to look at the brake itself to see why it locks up when engaged. Thanks to your Sears reference, I found a gold mine for parts info. But the diagram where I'd expect the brakes to be is unclear. By cross-referencing it to the APP parts pictures, I see I'd need to get underneath the splutch cam, which looks to entail removing a metal plate to which the motor and splutch assembly are all mounted. But it's not clear from the diagrams and pictures which of those pieces actually grab the driveshaft and stop it -- is it the splutch? None of the pieces look like they'll have anything like brake shoes that could apply friction to the driveshaft. Or is the solenoid linkage supposed to only pull the cam part of the way?? If it is possible that taking that assembly apart would reveal something I could fix, what's your estimate on my likelihood of success here? I'm slightly afraid of that spring that counters the brake solenoid; I don't want to loose an eye on account of this fix. Unless it's clear that mucking with the brake assembly will fix the problem for good, I'm inclined to just get another washer. ps - If you're working with a direct drive, this may be interesting... but I don't think it applies to me.
|
|
|
|
|
|
Rank: Advanced Member
Groups: Moderators
Joined: 7/14/2010(UTC)
Posts: 5,222
Was thanked: 1 time(s) in 1 post(s)
|
Originally Posted by: kcarnold Thanks! I'm increasingly suspecting brakes, because on closer inspection the snubber straps were broken, not disconnected. The solenoid and linkage look and feel fine; I'd have to look at the brake itself to see why it locks up when engaged. Thanks to your Sears reference, I found a gold mine for parts info. But the diagram where I'd expect the brakes to be is unclear. By cross-referencing it to the APP parts pictures, I see I'd need to get underneath the splutch cam, which looks to entail removing a metal plate to which the motor and splutch assembly are all mounted. But it's not clear from the diagrams and pictures which of those pieces actually grab the driveshaft and stop it -- is it the splutch? None of the pieces look like they'll have anything like brake shoes that could apply friction to the driveshaft. Or is the solenoid linkage supposed to only pull the cam part of the way?? If it is possible that taking that assembly apart would reveal something I could fix, what's your estimate on my likelihood of success here? I'm slightly afraid of that spring that counters the brake solenoid; I don't want to loose an eye on account of this fix. Unless it's clear that mucking with the brake assembly will fix the problem for good, I'm inclined to just get another washer. ps - If you're working with a direct drive, this may be interesting... but I don't think it applies to me. No this is not a direct drive unit and wont apply to you. Since you have found the solenoid and brake spring the rest is easy. the brake board assembly '); return false; " style="text-decoration:underline;" href ="http://www.appliancepartspros.com/partsearch.aspx?pn_= 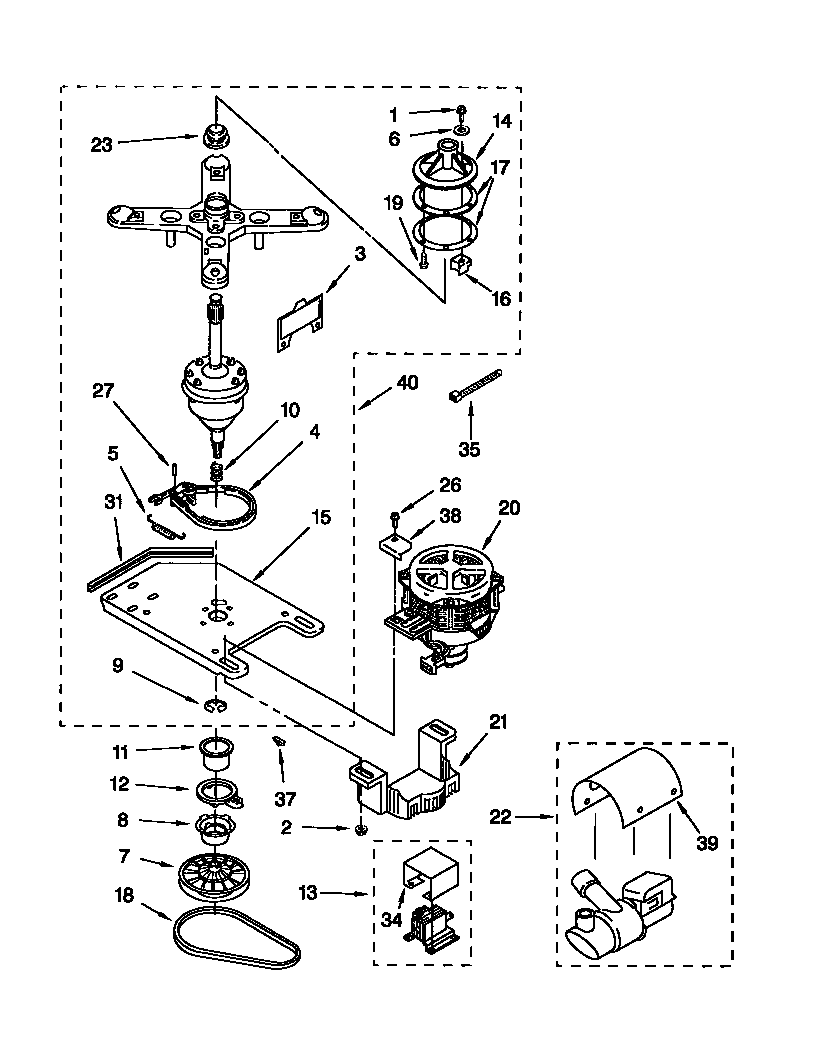 " target="_blank">Part number:
" target="_blank">
 " border="0" alt="Part number: " title="Part number: ">
">
part number 3428323 / item 4, is attached to the solenoid and linkage. Yes you will need to use caution when removing the brake spring. I have not had a problem with them in the past, they look bigger and stronger than they are.I'm confident you should be able to perform this repair using caution and basic tools.
|
|
|
|
|
|
Rank: Member
Groups: Registered
Joined: 7/19/2010(UTC)
Posts: 6
|
Alright, I finally got the assembly off to access the brakes: 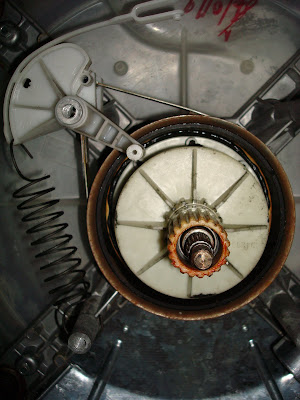 Do I correctly call the pads between the ring and the shaft "brake shoes"? 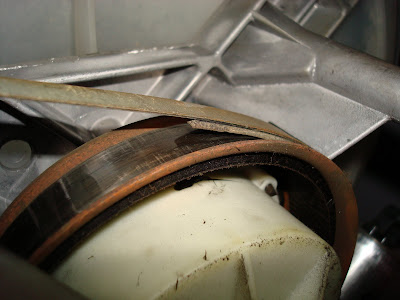 (wow, helping the autofocus with a flashlight makes a huge difference in picture quality!) And am I correct to suspect that worn brake shoes are causing the sticking? If so do I need to replace this whole $46 assembly? Is that the whole metal ring too or just the band and shoes? because it seems quite pricy for something so simple. (And I'm certainly not going to buy it without a picture of what I'm getting.) Could I just replace the brake shoes? (I don't have a grinder...) Thanks for your continued help. I probably would have given up and called somebody by now otherwise. I'm still tempted to...
|
|
|
|
|
|
Rank: Advanced Member
Groups: Moderators
Joined: 7/14/2010(UTC)
Posts: 5,222
Was thanked: 1 time(s) in 1 post(s)
|
Originally Posted by: kcarnold Alright, I finally got the assembly off to access the brakes: Do I correctly call the pads between the ring and the shaft "brake shoes"? (wow, helping the autofocus with a flashlight makes a huge difference in picture quality!) And am I correct to suspect that worn brake shoes are causing the sticking? If so do I need to replace this whole $46 assembly? Is that the whole metal ring too or just the band and shoes? because it seems quite pricy for something so simple. (And I'm certainly not going to buy it without a picture of what I'm getting.) Could I just replace the brake shoes? (I don't have a grinder...) Thanks for your continued help. I probably would have given up and called somebody by now otherwise. I'm still tempted to... Good morning, Thanks for the pictures, a great help. You have found what we're looking for. It would be correct to call the assembly a brake shoe but a parts order person would probably not recognise that term. You would want to use the same terminology as the part description in the parts order screens. The part you would need is only the "brake shoe" assembly,and not the metal ring. I have occasionally cleaned and sanded the pads and the ring with emory cloth, but this is usually only a temporary repair. In some cases it may last as little as 1 month and may last 12. But you may want to give it try, before you purchase the part. Have a good day
|
|
|
|
|
|
Rank: Member
Groups: Registered
Joined: 7/19/2010(UTC)
Posts: 6
|
Originally Posted by: Joe / APP Team Good morning,
The part you would need is only the "brake shoe" assembly,and not the metal ring.
Well you've sold me; I'll order new brakes, plus the parts to fix the damage, tomorrow. [LIST=1] Is the $47 "brake band" the right part? Does it include the clip that attaches it to the solenoid? (I may have lost that...)
I'm still a bit confused: why would bad brakes stick instead of slipping?
I'm having trouble actually getting the brake band off. What am I missing?
Will I need to re-lubricate any of the drivetrain assembly?[/LIST]
Thanks again,
-Ken
|
|
|
|
|
|
Rank: Advanced Member
Groups: Moderators
Joined: 7/14/2010(UTC)
Posts: 5,222
Was thanked: 1 time(s) in 1 post(s)
|
Originally Posted by: kcarnold Well you've sold me; I'll order new brakes, plus the parts to fix the damage, tomorrow. [LIST=1] Is the $47 "brake band" the right part? Does it include the clip that attaches it to the solenoid? (I may have lost that...)
I'm still a bit confused: why would bad brakes stick instead of slipping?
I'm having trouble actually getting the brake band off. What am I missing?
Will I need to re-lubricate any of the drivetrain assembly?[/LIST]Thanks again,
-Ken Ken. Yes, the Brake Band is the right part to order, as to clip you may have lost, I don't believe that will come with the brake band. The brake would stick due to wear and debris build up from the pads themselves, similar to brakes on a automobile(when they squeal)but in this case there is such a build up(not really visible)that the pads grip and lock on the drum instead of it slipping, slowing the revolutions(2 or 3) to a stop. The band does fit tight it will require you to spread the band and raise it up off the drum and spread it again to get it off the gearcase housing, as best I can remember. No, you should not need to re lubricate any of the drive train assembly, you may want to clean the solenoid actuator shaft and make sure it is free moving.
|
|
|
|
|
|
Forum Jump
You can post new topics in this forum.
You can reply to topics in this forum.
You can delete your posts in this forum.
You can edit your posts in this forum.
You cannot create polls in this forum.
You can vote in polls in this forum.
Important Information:
The AppliancePartsPros.com uses cookies. By continuing to browse this site, you are agreeing to our use of cookies.
More Details
Close