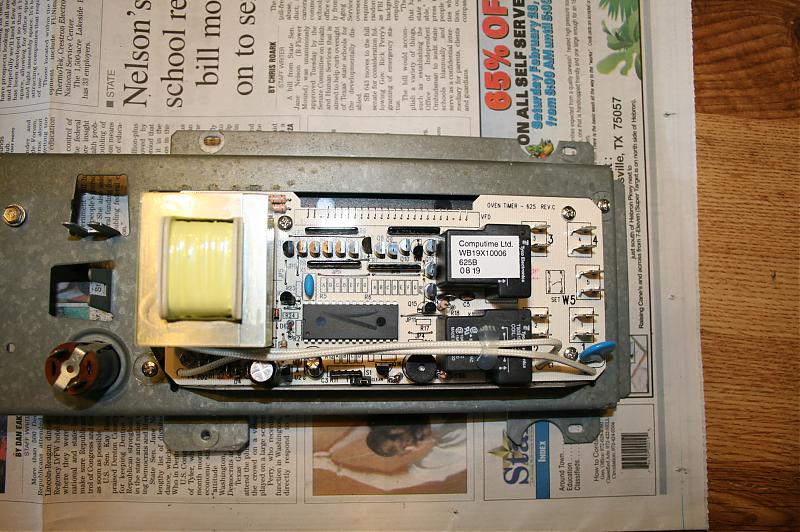
The new electronic clock/timer (part number WB19X10006, APP item number AP2633678) designed by GE as a replacement for the old analog clock/timer WB19X5231. If the new clock is wired properly then it should do everything what the old clock did. Also there could be problems with alignment holes on the glass panel.
You have to choose if you are going to leave it as is, to do it yourself or to call a qualified tech to do it for you.
Hi-
I’m new and found this forum through of a search I did because the timer on my JKP36D is shot. Since I have the same problem, I have 2 questions. My local repairman told me there is a place that rebuilds and sells rebuilds of the original mechanical timer. He said that many people find the replacement electronic timer difficult to use. He also said that rewiring is complicated. Since he quoted me $315 for a new one or $302 for a rebuilt one, I am interested in doing this myself. I am fairly handy (I have replaced a dishwasher motor).
Any idea where I can get a rebuilt? Should I bother or just go with the electronic replacement? If I go with the replacement is it difficult to wire or use. If I get the original rebuilt, is it possible to use the ovens without a timer in the meantime?
I do not have any information regarding companies who does rebuilt analog clocks but you probably can find one over the Internet.
The electronic replacement timer comes with the instillation instructions and if you can read wiring diagrams then you probably can install them.
The model number you posted is incomplete. If you need help with the right part number for the replacement timer then we need the complete model number of the oven.
I know this thread is kind of old, but I’m glad to have found it because I need to replace my “dead” clock as well. This looks like a very doable project, but in looking at my existing clock, it doesn’t look like the existing small timer knobs will fit through the glass holes. How do they come off? Do the black knobs come off of the silver posts, or do the silver posts come out of the existing clock assembly?
Thanks in advance for your response, Keith.
GE had replaced the old analog timer, used in your oven, with the new digital timer with the part number AP2633678.
You do not have to use the old knobs because the new timer comes with the set of new buttons instead of knobs. You can see them on the pictures if you click on the part number.
The new digital timer needs rewiring, but if you will carefully follow the instructions included in the kit, you can do it.
Thank you Gene, there are a couple of things I am still wondering about though.
First, do you know how I would remove the small knobs from the existing clock? They do not look like they would fit through the glass panel, but I can’t tell if the black knob comes off of the silver post, or if the silver post comes out of the clock assembly. I thinking through how to disassemble the existing clock, even though as you note I won’t need to re-use the old knobs.
Also, on the web page for the replacement part, there is this note: "Please note per GE: Jumper Wire For Phase 2&3 Of Self Clean Must Be Made By Tech In Field “y” Wire. " It looks like there are several wires included with the new clock, but do you know if there is a “jumper wire” that has to be custom made?
[QUOTE=Keith C;62898]…how I would remove the small knobs from the existing clock? They do not look like they would fit through the glass panel, but I can’t tell if the black knob comes off of the silver post, or if the silver post comes out of the clock assembly…
…I thinking through how to disassemble the existing clock, even though as you note I won’t need to re-use the old knobs…
…It looks like there are several wires included with the new clock, but do you know if there is a “jumper wire” that has to be custom made?..[/QUOTE]
Keith,
Just pull the old knobs out. They will come off of the silver posts which are actually a part of the clock. Knobs could be stuck, so be careful not to break the glass.
In order to remove the control panel you have to remove all knobs, the knob from the door latch handle, unscrew the ring at the latch release button, remove the screws on the top and on the bottom of the control panel and pull the control panel out. Do not remove any wire until you read the installation instructions and understand what has to be done. Draw a picture of wires connection for yourself, so you’ll be able to undo it at any time.
Don’t think about the new timer installation until you’ll receive the kit and read the instructions. If you know how to read a simple wiring diagrams then it’s not going to be very difficult.
Gene, I don’t know if you happen to be reading the forum, but here’s an update. I’ve received the replacement clock, and today began replacing the old clock.
Disassembly of the oven has gone fine, wiring all looks good. New clock fits into the existing metal bracket just fine. I’ve been taking pictures along the way, and when all is done I’ll post all of the steps.
But— on the clock ordering page, there was a note about potential problems with alignment to the holes in the glass, and that’s exactly what I’m seeing. I’ve attached a photo of the new clock mounted behind the glass.
The alignment isn’t close enough for this to work, and there’s no adjustment room to move the new clock side to side. Any ideas?
Gene, I’ll see what I can do with adjustments today. Maybe see if the metal tabs that came with the new clock can be used together with the old bracket.
I wonder if there is a replacement bracket to go along with the new clock?
I’m attaching front and rear views of the new clock in the old bracket. Note in the rear view, the mounting screws are in the upper right and lower left.
It looks to me that you have to remove the new clock from the bracket and cut the opening in the bracket on the right side, so you will be able to move the clock to the right.
It looks to me that you have to remove the new clock from the bracket and cut the opening in the bracket on the right side, so you will be able to move the clock to the right.
Gene.[/quote]
Gene (or anyone): I had one of these replacement timers installed years ago. After reading this thread, I think I understand now why the oven doesn’t self-clean any more; the tech didn’t know about the “Y” jumper wire. Can you tell me exactly where this jumper has to placed? The tech left no instructions and is no longer in business. Thanks. Gene R.
I’m reposting the picture of the back of the clock timer, and I’ve circled in red the only jumper I saw. There are three “posts” and the jumper is over the two on the right. The word “CLEAN” is just to the right of the jumpers.
Just to finish the series of messages I’d posted on this thread, I never could get to a solution to make the clock/timer fit properly, so I returned it for a refund.
[quote=Keith C;78652]I’m reposting the picture of the back of the clock timer, and I’ve circled in red the only jumper I saw. There are three “posts” and the jumper is over the two on the right. The word “CLEAN” is just to the right of the jumpers.
Just to finish the series of messages I’d posted on this thread, I never could get to a solution to make the clock/timer fit properly, so I returned it for a refund.
Keith[/quote]
Thanks Keith. Just to be clear… that jumper was there when you received it and the self-timer worked when wired per the diagram?