Brand:Samsung
**Model Number:**NE63T8711SG/AC
Main Symptom:Infinite switch replacement
What happens & when:
Error Code (if any):None
Parts or tests already tried:None
Photos / video link:
Brand:Samsung
**Model Number:**NE63T8711SG/AC
Main Symptom:Infinite switch replacement
What happens & when:
Error Code (if any):None
Parts or tests already tried:None
Photos / video link:
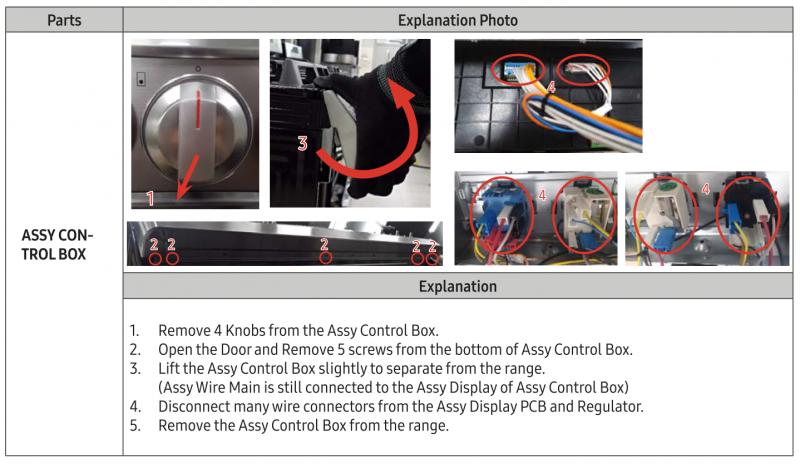
With the power cord unplugged or the breaker turned off, and the knobs removed, there are three screws under the front panel that will need to be removed. Once they are removed, rotate the bottom of the front panel out then lift it up. This will give access to the wires behind the front panel.
Thanks for the info William.
I did remove the three screws and did as you say but, for some reason when I have the bottom of the panel tipped out and lift up it feels like the whole glass top is lifting as well. I’ve watched some YT video’s of a similar Samsung front panel removal and it seemed effortless to disengage the panel. I didn’t want to get to physical with the removal and break the glass top. It feels like there’s something else holding it from dis-engaging. The range is only 4 years old.
Cheers ![]()
Jack
It may need to be rotated out slightly more to disengage it at the top.
I’ve attempted to remove it twice already but, will try again and see what result I get. I’ve tipped it out a fair amount and when lifting it up as mentioned its lifting the glass top as I try to disengage it. From the YT video I saw there appears to be two tabs that secure the top edge, possibly sticking there. Maybe the third time will be a charm. Thank you for the prompt reply.
Cheers ![]()
Jack
Hopefully, the third time does the trick. Unfortunately, I don’t see any other way of going about this. On this model, there are two screws behind the front panel that secure the front of the cooktop, so removing the cooktop isn’t an option.
Hi William:
The problem in removing the panel was there were two additonal screws for a total of 5 that needed to be removed before you can remove the panel. Once those two additonal screws were removed one at either end of the panel, I was able to remove it. They were recessed and somewhat hidden and didn’t appear as though they were securing the panel.
I found this on another forum.
Cheers ![]()
Jack