[I]updated the tutorial with more detailed info, few more pics & edited the embedded text to contain more details. the aboutthistutorial.txt file found inside the zip has been redone to also contain more detailed, specific info.
easier for everyone is a FreakShare link to download the zip & avoid email attachment limitations. please use google & download a free zip utility program if needed. here’s the link:
Just completed my neptune bearing repair. The job was made easier by info found here & other forums. Thought I’d give back by posting a picture tutorial of my experience & maybe someone facing the same repair will find this helpful. There are 14 pics with comments, maytag manual, maytag technical bulletin & 1 text file. Highlights include home made, cheap bearing seating tool, close-up pics & severely corroded aluminum housing that was salvaged using JB Weld.
The maytag manual & tech bulletin were found elsewhere on the web but I can’t remember where to give credit-not my work for sure.
The repair was actually quite easy(for me!) & soooo nice having a non-leaking, whisper quiet machine again!!
edit added 03/13/2012: please use the new FreakShare link. It’s free. Just wait for the countdown clock to reach 0 then the free button will activate, nothing to buy & no need to register. It is a zip file.
See Neptune Bearing for help with replacement bearings, 12002022 seal kits, bearing spacers and the tony tool rental program.
If you are a technician and you would like to replace the Neptune bearings instead of the outer tub see Neptune kits for ordering the tony tool and bulk bearings.
a few things about the frequently mentioned tony tool…
it’s a quality crafted piece of equipment that’s a definite value for those repair novices. it will streamline the process, make it safer, prevent damaging the outer tub and remove much of the anxiety homeowners may have.
however, it’s NOT a required, must have tool. there are other methods available that will go a long way in keeping expenses to a minimum - other than the cost of parts. the bearing seating tool in my first post can be assembled for approx $10 & a cheap bearing puller can be had for $25 or less. a puller is optionable but without it you’ll need to commit more time & patience to bearing removal. i prefer using a 3-5lb mini sledge & heavy pipe or drift. make contact with the outer ring/race of the bearing. careful not to gouge the relatively soft aluminum housing. don’t use a short piece of pipe that will guarantee you hitting/cracking the outer tub should you have a mis-directed swing of the sledge.
other than my time, price of seal kit & bearings, my additional cost for seating tool, jb weld & rotary wire brush…about $20…making the entire repair less than $80.
in the world of bearings i’d rate this a ‘2’ on a scale of 1 to 10, and that’s only because of the spacer that resides between the two bearings - needs to be centered so the spindle shaft can be inserted. of course, if you’ve never laid eyes on a bearing and/or never been inside a major appliance then i understand rating this a 10 on the difficulty scale.
…and that’s where the cost of the tony tool is completely justified and represents a good value.
the tutorial has been revised; pics added, more details & the aboutthistutorial.txt file has been redone with more details concerning the repair process. a megaupload link has been added to the first post for direct download. ty.
Thank you so much for your work. I am in the middle of a bearing replacement and this thread is quite helpful. I have a couple questions for you:
The pvc adapters you used for the bearing tool, I know you said they are 2" fem adap w/cap and a 2x1/2" bushing,… did you have to modify the pvc fittings? I imagine you had to at least drill a hole in the cap. Thanks again for your work!
B
ps. re: Tony Tool. It is one thing to mention the quality of a tool, (the tony tool certainly seems like a well-crafted instrument) but to be considered a value at the outrageous price of $450 (I think, maybe more with s&h) when a replacement tub with bearings installed is $500 I think is much too kind. If I were a serviceman using the tool a few times a week or even a month is one thing, but joe-homeowner looking to save money on a big repair like this(that’s me) is SOL… until now! Thanks again for the advice on making the tool.
Peace
The spinner support (pn 22003925) should be replaced as well. The new lip seal design is supposed to cure this problem in the future, and looks like a much better design. Part costs $100 but includes the $40 lip seal. Took me about 3 hours with no prior washer experience.
Many thanks to the forum and especially this post. My washer is new again
I would love to see photos of how the spacer is placed between the bearing and the seal. My machine is the MAH5500BWW. I somehow left out the spacer during reassembly because the instruction sheet that came with the bearing kit was so vague. When I pulled all of the old parts out there was a spacer in with the “residue” (you should have seen what was left of the bearings and the seal!). Any help would be much appreciated!
Haven’t participated in the forums much since Nov of 09 with my original posts.
The megaupload link is alive and well as of this post with 223 downloads.
Approx 6 months since my repair and all is well with my neptune & no leaks! I was worried about leaks due to the use of jb weld but the repair is holding up.
A few replies…untimely as they are…
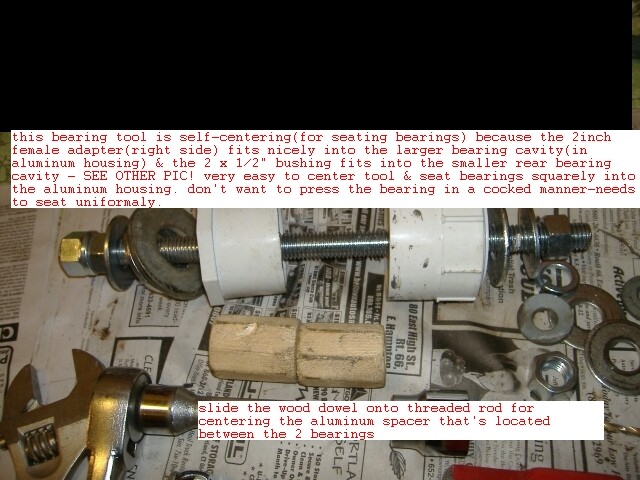
Barnaby: yes, i did modify the cap(more like the threaded plug) that screws into the female adapter, simply drilling a hole in the center for the threaded rod to pass through. The bushing was left as is when bought with the 1/2" hole more than big enough(slightly oversized) for the threaded rod.
I agree with your comments about the Tony Tool, way too much $$$ for a homeowner repair job.
Aboonski: Spacer? You mean the white plastic “A” clip shown in lower right corner of pic in post # 4? Maybe there were other spacer that I just don’t remeber..lol.
My email at indy606@hotmail.com is still active and I have replied to many peeps. I will help where & when I can.
Kudos to all that have completed the repair and good luck to all those that need to tackle the job.
Wow, this looks complicated. How long does something like this take? I am pretty handy and have repaired my dishwasher as well as replacing the icemaker, both solenoid valves and the defrost timer and heater from my jenn-Air products.
See Neptune Bearing for information on the new bearing and 12002022 seal kit. You can also rent a special Neptune bearing tool kit that includes use of a 14 minute DVD that shows the disassembly, bearing swap and seal kit installation. There is a 5 minute video clip on the site you can watch the tool in action.
The bearing job can take 1.5 - 5 hours depending on condition of bearings and how much cleaning you do while you have her apart.
Don’t forget to replace your door latch wax motor if you have the original one with the brownish color actuator pin.
Thanks for the reply. I think I’ll buy it and give it a shot. I did replaced this wax motor 3 years ago. The machine won’t spin so I sent out the board to a guy on E bay and he replaced the burned resistor on the board and included a new wax motor. Worked perfect until this loud spinning cycle.
[quote=NeptuneHelp;234399]See Neptune Bearing for information on the new bearing and 12002022 seal kit. You can also rent a special Neptune bearing tool kit that includes use of a 14 minute DVD that shows the disassembly, bearing swap and seal kit installation. There is a 5 minute video clip on the site you can watch the tool in action.
The bearing job can take 1.5 - 5 hours depending on condition of bearings and how much cleaning you do while you have her apart.
Don’t forget to replace your door latch wax motor if you have the original one with the brownish color actuator pin.[/quote]
[COLOR=#000000]CRYSTAL368, Thanks for all the information.[/COLOR]
[COLOR=#000000]I have the bearings and seal on order. I am collecting the parts to make the tool you describe. Most of the stuff is right off the shelf at the big box store. I hope to have everything ready when the parts arrive.[/COLOR]
[COLOR=#000000]I just need the wooden dowel. You did not provide dimensions. I would like the O.D. and length so I can make one A.S.A.P.[/COLOR]
[COLOR=#000000]Thanks again.[/COLOR]
[FONT=Calibri][SIZE=3][COLOR=#000000]I bought the bearings and seal through Amazon.com. The bearings came from Reid Supply ($5.82 & $8. 22) and the Seal from McCombs Supply ($31.95). While I was waiting for the bearings to arrive, I gathered all the parts to make Crystal368’s bearing tool. I could not make a good wood dowel. I don’t have a lath. I couldn’t do a good job of drilling the hole in the center with a drill press.[/COLOR][/SIZE][/FONT]
[FONT=Calibri][SIZE=3][COLOR=#000000]The hardest part of this job is the bearings, particularly the front (inner) bearing (getting the bearing in and out). Thursday night I got the machine apart and the rear (outer) bearing out. I sprayed penetrating oil on the front bearing and called it a night. [/COLOR][/SIZE][/FONT]
[FONT=Calibri][SIZE=3][COLOR=#000000]Friday night I was able to bang out the front bearing. I put the front of the machine on the floor. I was able to get better leverage that way. When I tried to install the bearings, the 2 X ½ PVC Bushing didn’t hold up. It collapsed on one side and cocked the bearing. I ended up tapping on the rear bearing to get it started. Then I banged it the rest of the way in using the old bearing and a big hammer. I tried using the Crystal368’s bearing tool to put the front (inner) bearing, but it kept cocking. Each time it cocked, I had to bang it out and start over. The third time banging it out, I damaged the seal. Went to bed.[/COLOR][/SIZE][/FONT]
[FONT=Calibri][SIZE=3][COLOR=#000000]Saturday morning I went to all the auto part stores in town looking for a bearing. The big chains of auto part stores are useless. Auto Zone could not look up the bearing without the make and model of the car. Advance took forever to find it in the computer. Of course they didn’t have one. Napa knew exactly where to find the bearing. Of course they didn’t have one. Bumper to Bumper didn’t have the bearing with the seal. The next store had it for $60. I bought it. The wife didn’t want to go to the laundry mat.[/COLOR][/SIZE][/FONT]
[SIZE=3][COLOR=#000000][FONT=Calibri] I went to Tractor Supply and bought a 2-1/8 socket for a ¾” drive and a ¾” extension, to bang the bearing in. To keep the Spacer in place, I bought some ¾ plastic electrical conduit (gray) and a couple of couplings. The couplings have “stop” in the middle to limit how far the conduit can be put it to it. I cut one of the couplings approximately in half. I put the coupling half (without the stop) and the coupling on the end of the conduit. I put the conduit through the front bearing, spacer and then rear bearing. The outer diameter of the coupling fit well inside the bearing bore.[/FONT][/COLOR][/SIZE]
[FONT=Calibri][SIZE=3][COLOR=#000000]The machine is up and running again. I spent way too much time on the bearings. I imagine the Tonytool would have saved me a lot of wasted time and frustration.[/COLOR][/SIZE][/FONT]
Sure, overall the tony tool kit rental would have saved time as it was developed specifically for the solid door panel Neptune front load washers. See Neptune Bearing for details.
Keep in mind that the tool kit does not draw the front bearing out and you still have to bang it out. The key is to catch the failing bearings before they get too bad. You will notice your machine getting louder in the high speed spin cycle. Eventually, it will sound like a jet taking off…
I rented the Tony Tool from neptunebearing.com. I am a novice but determined DIYer and won’t do anything outside what requires standard tools. The kit came with instructions and a DVD that pretty much took me directly through the process. I was a bit confused about getting two versions of bearing seals but figured to go with original vs ‘revised’, as they showed in the DVD.
Putting it all back together, I find that the pulley wheel now tightens down on the drum to inhibit the machine from spinning. On a test everthing works but the motor bogs. I can loosen the bolt and the drum spins freely. I don’t think that’s how I want to leave it though.
We just got done replacing the seal and bearings on my Maytag Neptune and gave it a test run and a very odd smoke comes out of the hole where the water goes down into the tub. Any ideas? We took it all apart again and wiped up the excess grease and that seemed to help but it still smoked again. Do you think it’s burning off to much grease? If you spin the tub with your hand it does move easily.