Brand:LG Model Number: LRFXC2416S Main Symptom: door ice maker not working What happens & when: test button will not work - does not fill, etc. Replaced ice maker today - still nothing. Getting power as auger does work from the door.
Error Code (if any):
Parts or tests already tried: new ice maker
Photos / video link:
Since you already replaced the door ice maker and the new one will not enter test mode at all, I would stop chasing the water valve for now.
The key symptom is no response from TEST/FILL. On LG, holding TEST should initiate a harvest cycle; water fill happens near the end. If it won’t even start the cycle, the problem is upstream of the new ice maker.
LRFXC2416S — next checks
Power-cycle first. Unplug refrigerator for 30–60 seconds, restore power, then hold the ice maker TEST button about 3–5 seconds. LG notes that cycling power resets the ice-maker test logic.
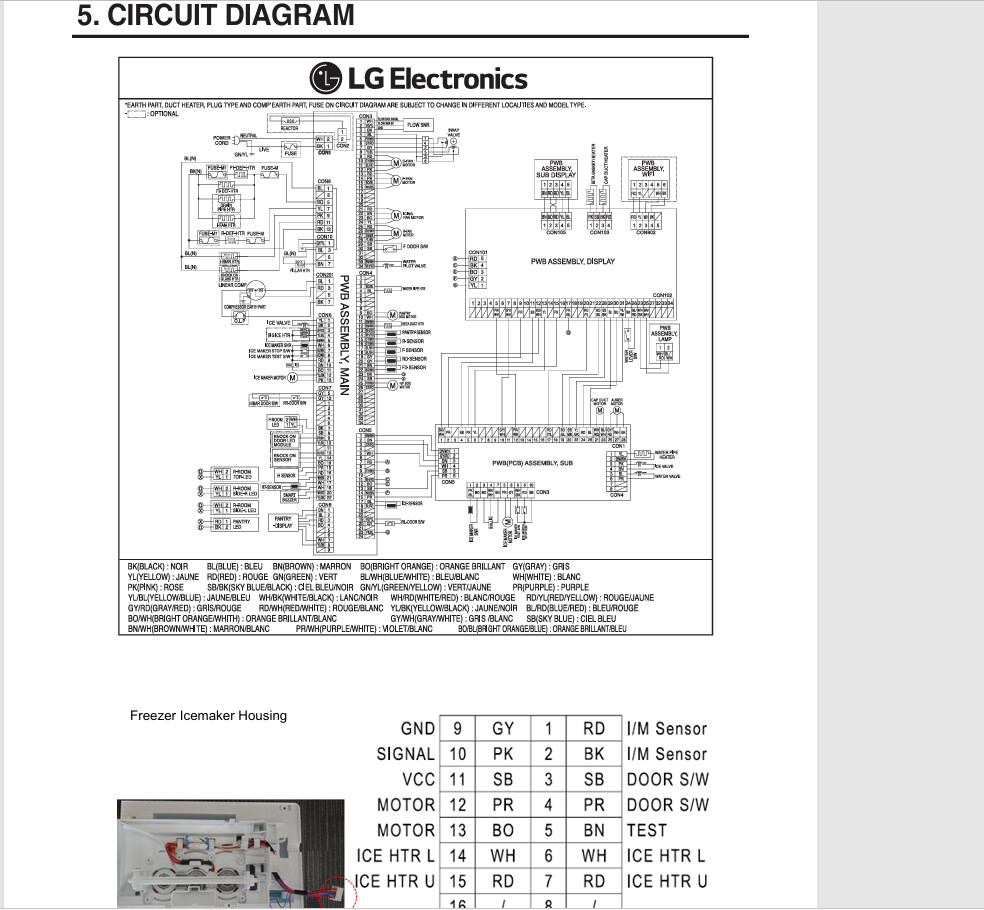
Check the ice-maker connector for supply voltage. Don’t assume the ice maker has power because the door auger works. The auger and ice maker are separate loads/circuits. You’re looking specifically for power and ground feeding the ice maker.
Inspect the left-door harness carefully, especially where the wiring passes through the top door hinge. Look for a broken/pulled wire, backed-out terminal, corrosion, or poor connection. A door harness failure fits very well with:
Auger works
Old ice maker dead
New ice maker equally dead
TEST button produces absolutely nothing
If the correct supply and ground are present directly at the new ice maker, yet it still won’t test, verify the replacement part/connector and then suspect the control/signal circuit. If supply is missing, work backward through the door harness/connectors toward the main PCB.
I wouldn’t replace the inlet valve yet. A bad valve could explain cycles normally but doesn’t fill. It does not explain why a new ice maker won’t initiate its test/harvest cycle. LG’s test procedure specifically uses that cycle to distinguish harvesting from water-supply problems.
My first meter check: voltage at the door ice-maker connector. If you give me the full model suffix (LRFXC2416S/00, /01, etc.), I can narrow down the connector/pin and expected voltage for you.
For LRFXC2416S/00, I can confirm the in-door ice maker is AEQ73110219.
With AEQ73110219 replaced and the TEST button still completely dead, I’d diagnose it this way:
Unplug the ice maker and meter the harness feeding it. At this point we’re trying to establish whether the ice maker is actually receiving its supply—not whether the dispenser/auger has power.
If no supply is reaching the ice maker, inspect the wiring/connectors through the left refrigerator door and upper hinge area before condemning the main PCB.
If the proper supply is present at the ice-maker connector, reconnect it and check whether the supply remains present under load. A poor harness connection can show voltage unloaded and collapse when connected.
If power/ground are solid under load and AEQ73110219 still won’t respond to TEST, then I’d move toward the control/signal side.
One correction to my previous answer: I don’t want to give you a pin number or voltage from generic LG information. I searched specifically for the LRFXC2416S/00 wiring/service information, but the publicly indexed material I found confirms the parts/diagrams without exposing the actual wiring schematic/pinout. So I can’t substantiate an exact connector/pin voltage yet. The model also uses a separate EBF61314816 door/magnet switch, which is another input worth considering in the control diagnosis.
Thanks so much for the great info so far, and for looking to find the wiring schematic…
I do have a multimeter, but am not sure which pins to check…
Looking at the removed icemaker’s harness… I can tell the blk, wht, gray wires run to the auger harness.
The other wires are: 2x blue for the temp probe. Then red (in the same pin as one of the blues), orange, brown, 2x light blue in the same pin, purple, gray. On the next row are yellow, orange/blue striped, an pink.
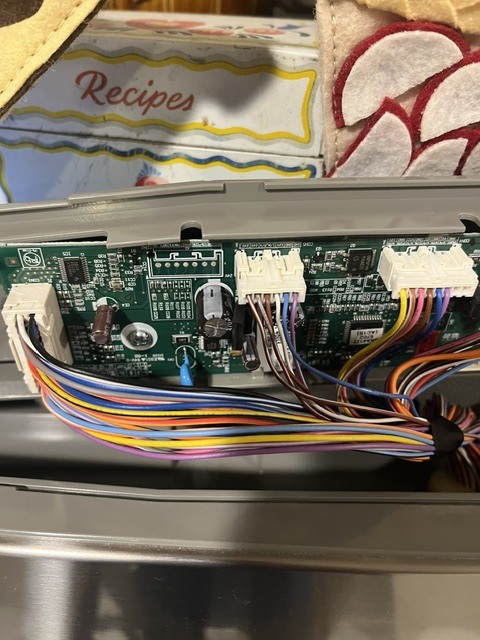
I took a look at the wiring area above the left door near the hinge. Inside that compartment is this sub control board part #EBR88124603… Just visually, I couldn’t see anything out of sorts or burned, etc…