Ice Maker Stopped Making Ice & Ice Dispenser Not Working

Brand: Kitchenaid
Model Number: KSC24C8EYY02
Main Symptom: Ice Maker Not Working
What happens & when:

Ice Maker Stopped Working

The ice maker for my Kitchenaid Architect Series side-by-side (Model KSC24C8EYY02) has stopped working. It was working erratically for months. I would flip the panel breaker to the refrigerator to reset the ice level sensor boards and that would work for a while then ice would stop harvesting. Prior to that stoppage, I could hear the ice maker fill and harvest.

I used diagnostic mode (entered by pressing SW1 and SW2 simultaneously on the freezer door control panel) and went to Test 15 and that showed that the emitter and receiver boards were good. When in Test 15, the front panel displayed 02 when the bin was empty and in place, and 01 when full/removed/ice maker turned off. The red LED on the emitter board worked correctly and did not flash indicating an error. Even so, I replaced those boards (W10870822 and W11813704), ice making resumed, and then stopped like before after a few days. I reinstalled the original boards. The ice maker worked again for a few days then stopped, this time for good so it appears.

I just installed a new refrigerator ice maker motor module (8201515). It’s been about 12 hours and no ice yet. The manual states it can take unto 24 hours to begin making ice. It’s been over 24 hours and no ice. I preformed the T-H jumper test:

  1. Disconnect the power supply
  2. Remove the ice maker module cover
  3. Jump T and H
  4. Tape both light switches for the freezer closed
  5. Connect power
  6. Observe the ice maker

If ice maker doesn’t run check it (whatever that means)

The ice maker did not run. I jumped the T-H correctly; there was contact.

My water filter is new and the water line is not frozen. In fact, the water inlet valve is brand new since the original one leaked. I checked the ice harvesting fingers and they are not frozen in place like some people have seen.

Ice Dispenser Not Working

Prior to the above issue, the in-door ice dispenser stopped working, although the water dispenser is fine. The ice dispenser paddle when pressed opens the ice chute flapper door (you can hear the sound of the motor and see the door open if you crane your neck) but the auger motor does not operate. When I release the paddle, the flapper door closes. I do notice when pressing the paddle for ice to dispense that I hear a faint click-click coming from somewhere in the back of the refrigerator, but I can’t say if that means anything.

I replaced the ice dispenser auger motor (WP2323603), ice actuator paddle (WPW10346924), and the electronic control board on the front of the freezer door (W11323058). None of these helped.

I inspected the wiring that runs through the freezer door at the floor level. I did not see any obvious wire bundle casing tears, crack or breaks. Nothing pinched.

I have not tried to replace the refrigerator electronic control board (WPW10235503) or the refrigerator main wiring harness (W10242384) since the refrigerator and freezer work perfectly otherwise.

Any suggestions would be truly welcome. Thank you!

Error Code (if any): None
Parts or tests already tried: Diagnostic 15 (Emitter/Receiver boards)
Photos / video link:
Thanks for the detailed explanation. You’ve already done quite a bit of troubleshooting, and the fact that you’ve replaced several components without resolving either problem makes me think we should focus on the electrical supply and wiring before replacing anything else.

On your KitchenAid KSC24C8EYY02, I would approach the ice maker and ice dispenser as two separate problems initially. However, because both systems have stopped working, we shouldn’t rule out a shared wiring or control issue.

1. Ice maker not harvesting

The most important clue is that jumping T and H did not start the ice maker motor.

Normally, jumping T and H on this style of modular ice maker should initiate a harvest cycle, provided the module has power and its internal conditions allow the test.

Since you’ve already replaced the motor module, I would check whether the ice maker is actually receiving power.

Here’s what I’d check next:

  1. Disconnect power and remove the ice maker module cover.
  2. Locate the test terminals marked L and N.
  3. Remove the T-H jumper before testing.
  4. Restore power, make sure the ice maker is switched ON, and simulate closed freezer doors as required.
  5. Using a multimeter set to AC volts, carefully measure between L and N.

This is a live-voltage test, so only attempt it if you’re comfortable working around energized electrical components.

What the results mean:

  • Approximately 120 VAC: The ice maker has power. We would then investigate the motor module, internal thermostat, and harvest circuit.
  • 0 VAC: The ice maker isn’t receiving its expected supply voltage. We would need to trace the power circuit, including the ice-level control system, wiring, and main control.

Your Test 15 results suggest the optical ice-level sensors are detecting the bin conditions correctly. However, that doesn’t necessarily prove the entire ice maker power circuit is functioning.

I wouldn’t purchase another set of emitter and receiver boards at this point.

2. Ice dispenser flapper operates, but the auger doesn’t

The fact that the ice chute opens when you press the dispenser paddle is helpful.

It tells us the dispenser is recognizing at least part of your request. Since you’ve already replaced the auger motor, dispenser paddle, and front control board, the next step should be checking the auger motor’s electrical supply.

Here’s what I’d recommend:

  1. Disconnect power and access the auger motor wiring.
  2. Inspect the motor connector for loose terminals, corrosion, or damaged wiring.
  3. Check the wiring harness where it passes through the lower freezer door hinge. Even if the outer covering looks fine, individual wires can break internally from repeated door movement.
  4. Verify the auger motor receives its specified operating voltage when ice dispensing is requested, using the model’s wiring diagram to identify the correct terminals.

The last step involves live voltage, so it should only be performed by someone experienced with electrical testing.

If the correct voltage reaches the motor but it doesn’t turn, we’d investigate the replacement motor and any mechanical binding.

If voltage is missing, we’d work backward through the door wiring, applicable switches, and control circuit.

That faint clicking you hear toward the rear of the refrigerator may be a relay responding to the dispenser request. It’s worth investigating, but the sound alone doesn’t establish that the main control board is defective.

3. Could the main control board be causing both problems?

It’s possible.

Your history of temporarily restoring ice production by cycling the refrigerator’s breaker is particularly interesting. That behavior can occur with an intermittent control issue, but it can also result from a poor electrical connection.

Before replacing the main control board or the refrigerator wiring harness, I’d want to establish where power is being lost.

Replacing the main control board without those measurements would still be a guess.

My recommendation

I’d start with just two checks:

First: With the ice maker ON and the door switches properly simulated, what AC voltage do you measure between the ice maker’s L and N terminals?

Second: When you press the ice dispenser paddle, does the auger motor make any humming or attempt to move, or is it completely silent?

Those two answers will help us narrow down whether we’re dealing with a power supply issue, a wiring problem, or a control failure.

You’ve already replaced enough parts that I’d rather help you pinpoint the failure before you spend any more money.

Thank you, Jeffrey. This is very helpful. I’ll run those tests this weekend and report back.

I realize that a visual inspection of the freezer door wires can’t reveal internal damage, and I’m concerned that is the issue, but let me run the tests to see what I find. If that turns out otherwise be the problem, then I’m looking at a new refrigerator or buying a separate ice maker.

Hi Jeffrey,

I had a bit of time so I conducted the L-N voltage test as you described. I wasn’t sure at first if I was contacting the metal contacts correctly through the holes with the probes and used a different set with longer tips. In any case, I never saw more than 0.3VAC.

I taped the freezer door switches and actuated the ice dispenser paddle. I could hear the chute motor and see the chute open but I did not hear humming or motion from the motor. Now, I didn’t take the housing apart further to access the motor, since I didn’t have the time, but I can do this. My previous visual inspection of the motor didn’t reveal anything noteworthy.

I can test the motor as you suggested unless you think I should try something else. It appears there is no power going to the ice maker unit nor the auger motor. Is there a common wiring harness serving these two components? How about a common control board? Otherwise, I fear it’s a wire in the freezer door. We obviously open/close it all the time, so what could have been a “short” is now a clean break.

Thanks.

Thanks for taking the time to run those tests. Your results give us a much better direction, and I agree with your thinking about a possible broken wire in the freezer door. Actually I’m fairly confident that is our primary suspect broken wires at the hinge point is a common issue

The fact that you’re measuring only 0.3 VAC between L and N at the ice maker is especially important. Assuming the probes were making good contact, that’s essentially no power.

Now we also have an ice dispenser that opens its chute but doesn’t run the auger motor. Those two symptoms could be related.

Could both problems share the same wiring?

Yes. On your KitchenAid KSC24C8EYY02, wiring for components in the freezer door passes through the door hinge area.

However, that doesn’t necessarily mean the ice maker and auger motor share the same power wire or control circuit. They may have separate circuits running through the same harness.

The fact that the chute opens tells us at least some of the dispenser circuitry is working.

Here’s what I’d check next

1. Inspect the freezer door hinge wiring first.

Before taking apart the auger motor housing, I’d start with the wiring harness near the bottom freezer door hinge.

  • Unplug the refrigerator.
  • Remove the lower grille if necessary.
  • Locate the electrical connectors and wiring passing into the freezer door.
  • Inspect for broken, pinched, or cracked wires, especially where the harness bends as the door opens and closes.
  • Check for corrosion, loose terminals, or wires pulling out of their connectors.

A wire can break internally while the insulation still looks perfectly normal.

2. Verify power at the ice maker again.

Your 0.3 VAC reading is a strong clue, but because you mentioned difficulty contacting the terminals, I’d like to confirm it.

With the refrigerator powered and the ice maker switched ON, measure between L and N again using probes that make reliable contact.

This is a live 120-volt test, so only proceed if you’re comfortable doing it safely.

If you still measure essentially zero volts, we need to trace the missing supply rather than replace another ice maker.

3. Hold off on replacing or testing the auger motor for now.

Since the chute opens but the auger doesn’t turn, the motor could be faulty. However, a missing electrical supply could produce the same symptom.

The next useful test would be checking whether the auger motor receives its specified operating voltage when the dispenser paddle is pressed.

I wouldn’t assume that voltage is 120 VAC without first confirming the motor specifications and wiring diagram.

If the correct voltage reaches the motor but it doesn’t run, the motor becomes our primary suspect.

If there’s no voltage, we’ll need to trace the dispenser circuit.

What about the control board?

A control board issue is possible, but I wouldn’t condemn one yet.

Your earlier diagnostic Test 15 indicated that the ice-level optical sensors were responding correctly. That suggests the refrigerator can communicate with those sensors, although it doesn’t prove the ice maker has its required power.

With both the ice maker and auger motor inoperative, I’d prioritize checking the freezer door wiring and connectors before purchasing another board.

One question that could help narrow this down

When you press the ice dispenser paddle, does the auger motor remain completely silent, or do you hear a faint click or hum coming from inside the freezer door?

If it’s completely silent, that makes checking the motor’s electrical supply particularly worthwhile.

I’d start at the hinge harness. If we find a broken wire there, it could explain why the ice maker worked intermittently for months before stopping altogether.

Hi Jeffrey,

I pulled the kick plate (lower grill) and inspected the wires running through the freezer door into the refrigerator body. I see water lines here as well.

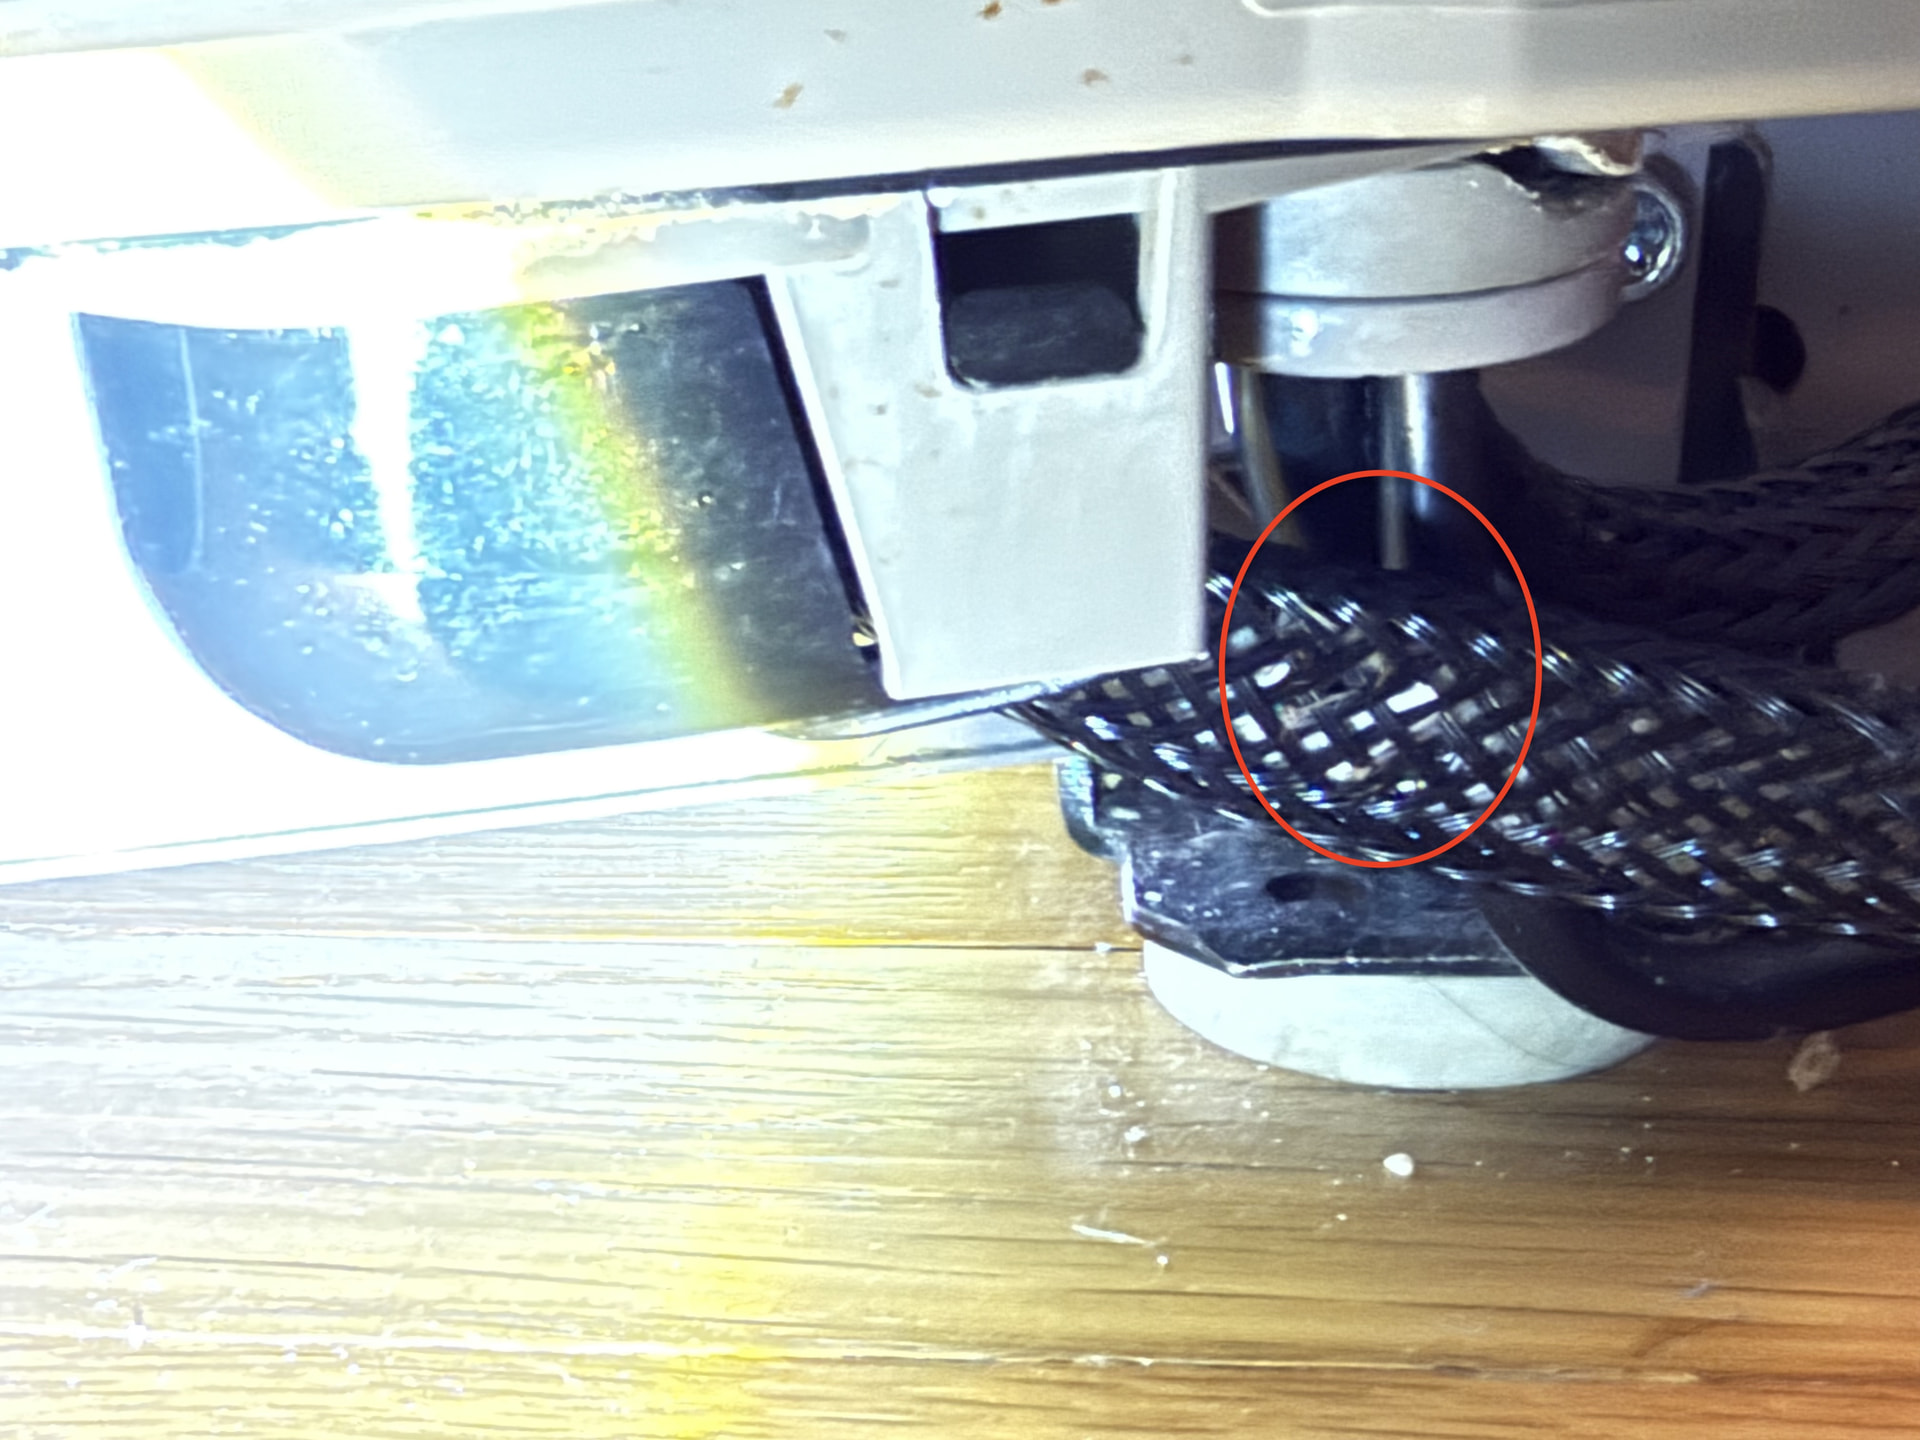
There are three modular connectors and all are firmly connected, no evidence of water damage in the area, no discoloration or corrosion, not obvious breaks or seperation. The main bundle surrounded in a black braided wire sleeve that contains wires with red, white, black and perhaps other color insulation has an area where there may be a break. It’s hard to see without cutting the braided wrap even using a flashlight. I think I can see a bit of bare copper wire but I cannot make out which color wire it is or if this is truly a break.

It is located right at the 90-degree turn from the door to the horizontal grill run. The braiding doesn’t appear cut or abraded. This is hard to describe without a photo and I cannot attach photos here.

Your thoughts? Should I carefully cut the grading along its length to get a good look at the wires inside? And can I use electrical tape to bind it up again if needed?

Thanks.

Yes but be very careful when you cut into it and please unplug the fridge first. Electrical tape will be fine to cover the wires with when you are done

You should see a paperclip or a button that says share to send your pictures. alternatively you can upload them somewhere and share the link or send me your email through here and I’ll reach out to you via email

Ok. I see how to upload photos now. You really cannot make out what I can see in person, but this is where I detect a possible break. I can catch what might be a glint of bare copper wire and some paper shielding that looks frayed. I am not sure what the wire construction is like inside the bundle without slicing it open. I think the sis the next step. If there is a break I can try to splice it with heat shrink self-soldering butt connector(s). There isn’t much room here nor excess wire.

Yeah you’re going to have to carefully cut into that and inspect the wires. That may be bits of insulation on the floor under can’t tell. Yes you can definitely fix any breaks with self soldering connector. And the fact it’s so short is the crux of the problem