I took off the front panel to see what is involved with replacement. I can’t find any obvious screws or fittings holding in the dispenser. The only thing that even looks remotely like a fastner seems to be plastic clips that would activate if one were to push a new dispenser in from the front of the door, and kind of “snap” it into place. Is this how it is done? or have I just not looked far enough for the screws/fastners? If it really is a snap fit, does it require sealant of some kind in the gasket?
Thanks for your help/advice.
You can find the instructions attached to the reply. If you need the correct part number then post the end of the model number and the serial number (FD…) of the dishwasher.
Gene
Thanks for the helpful info. The full number is bosch shu9915uc/uc11. I would gues that this means it is a vented dispenser, right?
If you could post the part number, I can be sure to get the correct one.
Any tips for getting the unit in properly? Is this really a DYI fix, or should I call a pro? I am pretty handy, but if the downside to a screw-up is a BIG problem, maybe the risk isn’t worth it?
Gene
A quick follow up. The problem with the soap dispenser is that the sliding door of the dipsenser is warped, and keeps coming out of the guide groove. Can the door be replaced separatley? The links showing bosch parts seem to show a separate door part, but most of the research i have done says the whle unit neds to be replaced.
Ant thoughts/comments on this?
If the door is separatly replaceable, How??
You were right - the dispenser for the model is vented.
The dispenser door can be replaced separate if the rails in the dispenser body are not damaged. The whole dispenser replacement makes repair more reliable.
If you know how to handle a simple tools then this part should not give you much troubles.
I have the same dishwasher and the problem with this dispenser. I’m going to replace the whole dispenser for a better reliability.
Can you give detailed instructions for how to remove the outer door to access the dispenser? There are quite a few screws along the sides of the door - so it would be great to know which ones need to be removed and which do not … I’d like to avoid taking more apart than I need to. Thanks.
Paparola
I ended up just replacing the sliding door, which was warped. If you have the same issue – just a warped door, it takes 5 minutes and nothing to remove ( except the old door and the spring).
if this is your problem, the door is readily available – it cost me $25, and instructions for installing it were posted earlier, i think, in one of gene’s repsonses.
If not, give me a way to contact you and I’ll give you info on how to get the door, and install. It is really easy – if just the door.
Thanks for your response. This forum is awesome!
My thinking is that I might as well get all new parts (motor, linkages, latch and door) since the whole assembly is only 2x the cost of just the dispenser door.
From this thread and an older one, I think that the dispenser replacement should go pretty smoothly. The last person on the older thread said that he had it done pretty fast after using the information given in the other posts.
BTW I also want to tighten the door handle a bit so I’m assuming that opening the door should give me access to that as well.
I can’t help you with the door tightening, but generally if you are a handy DIY-er, most of these things are pretty straight forward.
The only thing that discouraged be from replacing the whole unit was( is) the confusion over the venting. Mine is one of those rare exceptions that was idiffferent than the model number suggested ( I think!) and replacing the failed sliding door was a whole lot easier than messing around with vented/unvented and waiting for parts, because inevitably, which ever one i got, i would have needed the other one!
Hope it works for you.
Outer door removal removal requires the removal of the three short side screws on each side. And the long screws from each corner of the door. Do not remove the two screws along the top nearest to the latch.
Dispenser removal was very simple using a small screw driver to lift the metal fin next to each tab on the dispenser housing. Small brads were inserted at each tab to keep the fin from reengaging the tab. The dispenser pushed right out of the door when all the brads were in position. New dispenser simply pushed in and reengaged the metal fins - locking the dispenser into place when pressed firmly from the inside of the inner door. Only took a couple of minutes to make the swap.
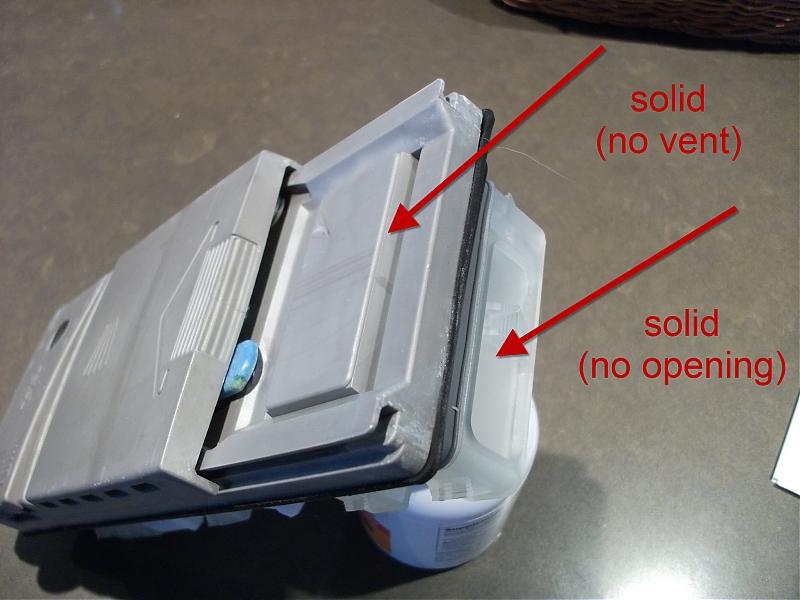
I bought both the vented dispenser called out on the SHU9915UC/11 part list and the not vented dispenser for the SHU9915UC/12. My model is the SHU9915UC/U11 unit and it has the vent on the right hand side of the tank but two different online parts store representatives insisted that this model requires the vented dispenser. The photos posted by the parts stores do not show the difference between the vented and not vented vesions.
After inspecting both dispensers, I can say conclusively that the SHU9915UC/U11 uses the not vented dispenser. I’ll be returning the vented one for a refund.
Its actuall very easy to tell them apart, and you don’t have to take the door apart to do it. You just have to know what to look for. The photos below show the difference.
[quote=GMS;236951]I have the SHU9915UC/U11 as well and I have confirmed that the dispenser is unvented. Do you happen to have the part # for it? I want to make sure that I am ordering the correct one and most people seem to carry the vented. (I am in Canada, which narrows my choices.)
I did it; was easy if you follow the trick I cited on an earlier post to this thread. You will need to be sure that you do not permanently deform the thin sheet metal fins when you remove the old one. You will need them in their original condition to hold the new one in place.
You can gently pry each fin off of the side of the dispenser with a very small flat screw driver blade. You barely need to bend each one to disengage it, but when you remove your screwdriver blade, the sharp edge of the fin will re-engage the dispenser unless you slip something in the gap before you remove the screwdriver blade. The trick is to insert a tiny brad or thin strip of metal (like a feeler guage) between each fin and the dispenser to keep it from re-engaging. I used small diameter ~1" long brads. Put 1 or 2 brads at each fin, one fin at a time. Once all of the brads are in place the dispenser just pushes out of the door into the inside of the washer.
The new one pushes back into the hole and engages the fins. The fins point into the hole, so the dispenser slides right in. The fins act like fishing hook barbs to prevent it from coming back out. No brads are needed for the install. Push it in firmly to make sure the gasket on the back of the new dispenser seals against the edge of the inner door hole. The uninstall / reinstall took only a couple of minutes after opening up the door. I hope this helps. It really was pretty easy.
Crosney
Check out one of the earlier replies, and there is a picture attached of the vented and unvented dispensers. They are not interchangeable ( at least , not if you want it to work right, although it will probably fit). There is confusion about whether the models came with vented/unvented, and it is quite clear that some models defy the wisdom of what is supposed to be installed. Mine was supposed to be unvented, and it was not. I think others have had the same experience. Just look at the pictures, they are very clear, and you will see quickly which one is right for you.
Another SHU9915/U11 with the non-vented dispenser.
Thanks to this thread and two others, removing the old dispenser was easy. Using small brads to keep the metal retaining tabs released is key. I also recommend having a towel or some padding for when the outer door releases and hits the floor.
Once the old dispenser was out, it was easy to see how badly the rails and retaining pegs had worn. Amazing the soap door would latch at all.
My issue was getting the new dispenser back in. It’s like the dispenser was fractionally wider than the original. Took quite a bit of muscle, grunting & groaning. Even so, the tabs are just barely engaged. It seems to be tight, but won’t know until I run it. Even so, any small leakage will be difficult to detect.
Sorry, but this is pi$$-poor lazy engineering. I expect better from Bosch. :mad:
I realize this is a very old thread, but I am having the same issue with the soap dispenser. Bosch tells me I need AP2802340. But when I received it the short side to the right of the soap area is completely open. My original is sealed. My unit seems to have the venting in the side of the tank. There seem to be two parts that are sealed: 490467 and 488964. What is the difference between them other than double the price? Can I use either one? My dishwasher is [MODEL]SHU9915UC/U11 FD8005[/MODEL]. And my original dispenser doesn’t look like either of the pictures posted previously by paparola1. It has vents, but is sealed. Can anyone tell me which part will work? So far Bosch has not been helpful.
Thanks, Gene. Interesting because the match tool on the site says it doesn’t work with my model. I still wonder what is the difference between 490467 and 488964?
You can find this information in the file attached to the first page of this thread. Open it and go to the second page.There are couple Hints on the bottom.