Rank: Member
Groups: Registered
Joined: 12/16/2010(UTC)
Posts: 12
|
Hi Guys, I just replaced the motor on my LG Dryer and thought I would post the procedure with some photos. I hope it might help some others in the future with a similar problem. 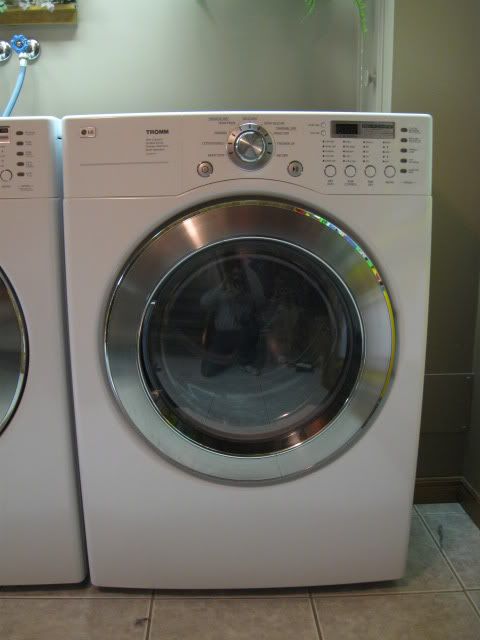  Model: LG Tromm DLE6977WAge of Machine: approx. 3 yearsSymptoms: After several loads, when the start button is pressed, the motor hummed, but the drum did not turn. If the dryer was left to cool down for several hours, it started normally and the drum turned.Problem: One of two springs in the centrifugal switch had worn through the aluminum retainer in the centrifugal switch casting and the spring had fallen out of the motor. As a result the centrifugal switch was occasionally sticking in the “on” position, preventing power from getting to the motor starter winding.Parts: 4681EL1008A (supercedes 4681EL1002A)Cost: $134 CAD (taxes and shipping included) Time: It took me 3 hours including the time to make notes, take photos, and clean all of the lint out of the machine. If I had to do it again, I think could easily pare this down to 1 1/2 hours. It is a fairly simple repair. Tools: No special tools required. Let’s Get Started! Model: LG Tromm DLE6977WAge of Machine: approx. 3 yearsSymptoms: After several loads, when the start button is pressed, the motor hummed, but the drum did not turn. If the dryer was left to cool down for several hours, it started normally and the drum turned.Problem: One of two springs in the centrifugal switch had worn through the aluminum retainer in the centrifugal switch casting and the spring had fallen out of the motor. As a result the centrifugal switch was occasionally sticking in the “on” position, preventing power from getting to the motor starter winding.Parts: 4681EL1008A (supercedes 4681EL1002A)Cost: $134 CAD (taxes and shipping included) Time: It took me 3 hours including the time to make notes, take photos, and clean all of the lint out of the machine. If I had to do it again, I think could easily pare this down to 1 1/2 hours. It is a fairly simple repair. Tools: No special tools required. Let’s Get Started! 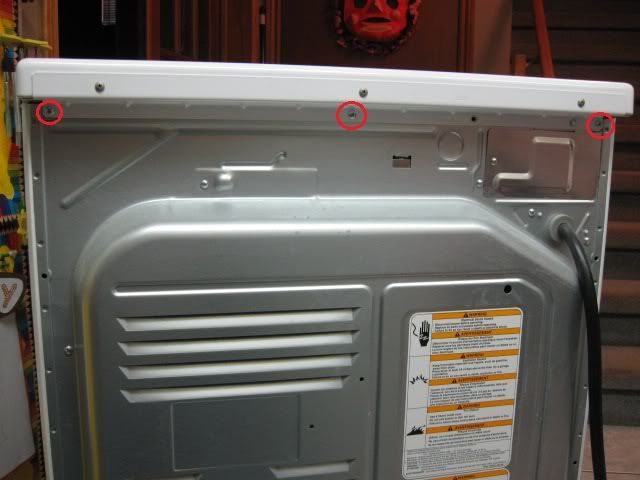 1. Unplug the dryer. Remove the 3 screws at the back of the machine (circled in red).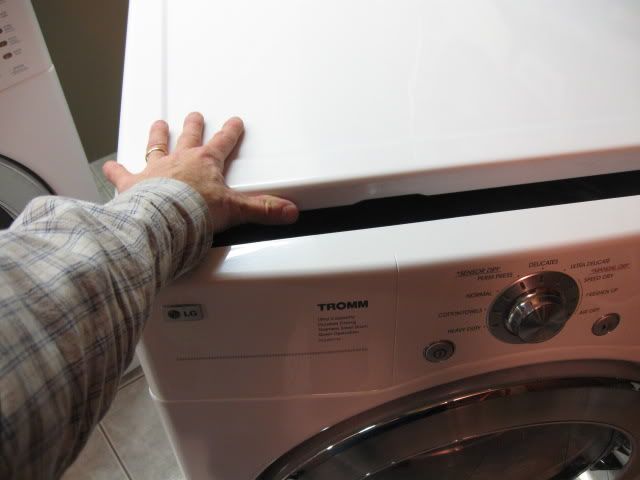 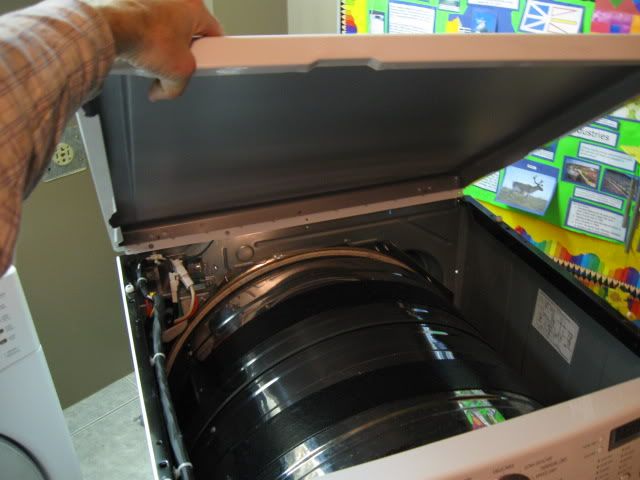 2. Push the top cover back about 1”, lift the cover off and set aside.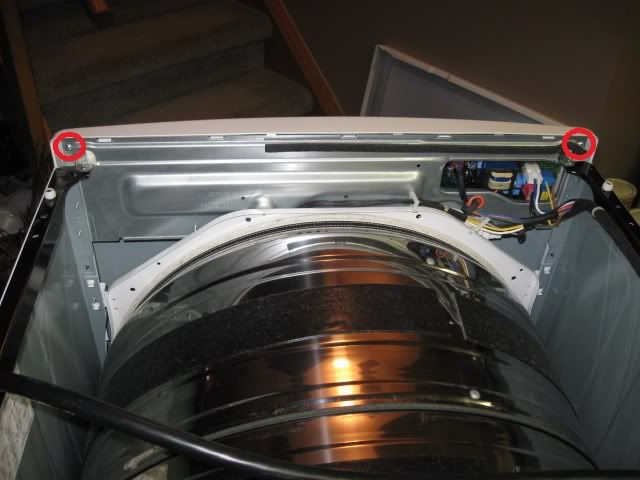 3. Remove the 2 screws (circled in red) securing the front plastic control panel. 3. Remove the 2 screws (circled in red) securing the front plastic control panel. 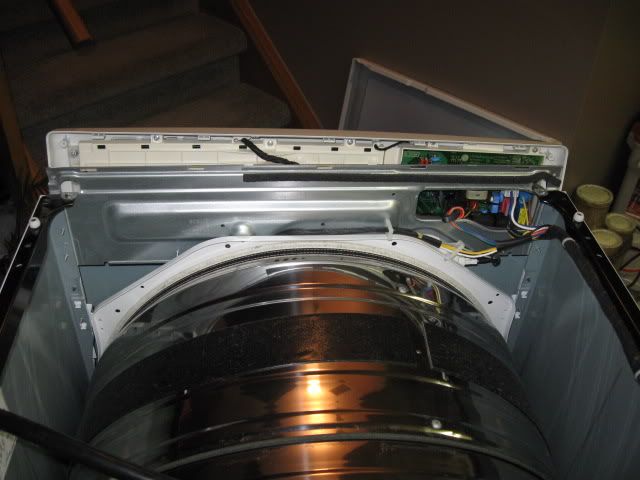 4. Push down on the three plastic snaps and gently pry the front plastic control panel forward. 4. Push down on the three plastic snaps and gently pry the front plastic control panel forward.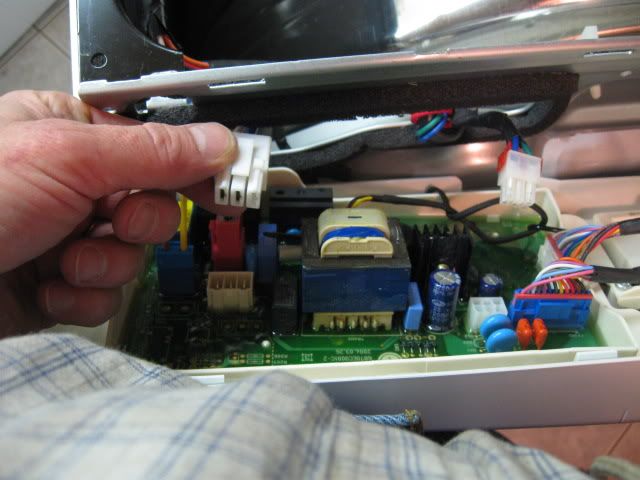 ] 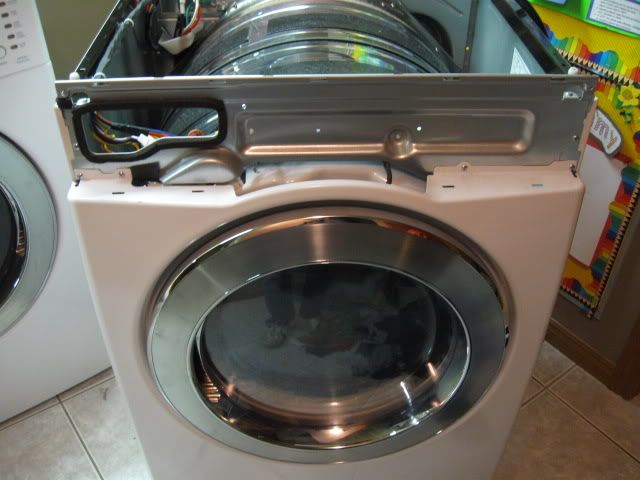 5. Disconnect the 4 wiring harness connectors from the circuit board. Squeeze the connectors as shown to disengage the latches. Remove the front plastic control panel and set aside. 5. Disconnect the 4 wiring harness connectors from the circuit board. Squeeze the connectors as shown to disengage the latches. Remove the front plastic control panel and set aside.
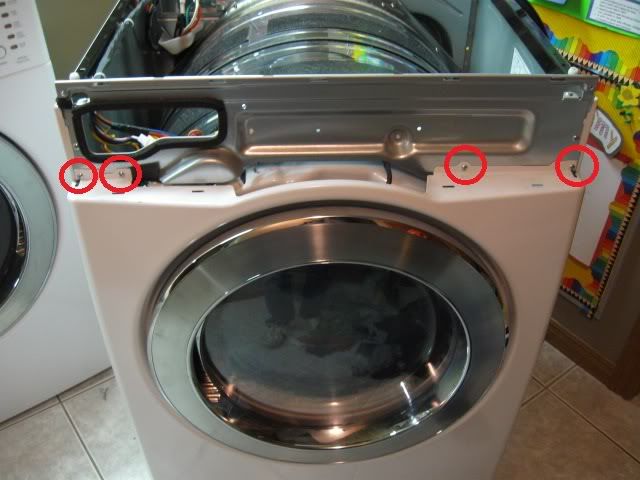 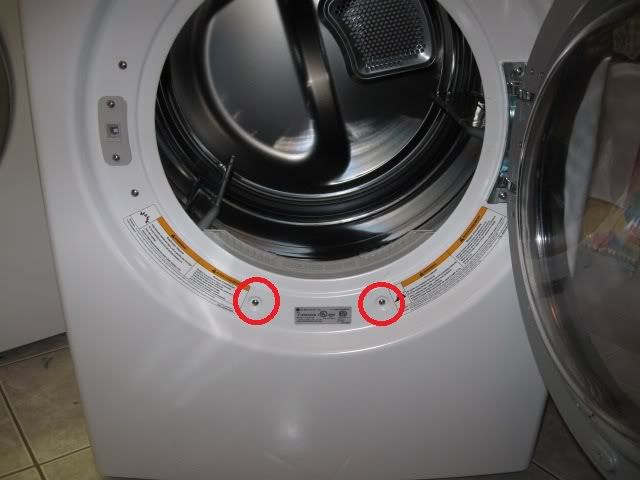 6. Remove the 4 screws circles in red. Open the door and remove the 2 lower screws circles in red. Close the door. 6. Remove the 4 screws circles in red. Open the door and remove the 2 lower screws circles in red. Close the door.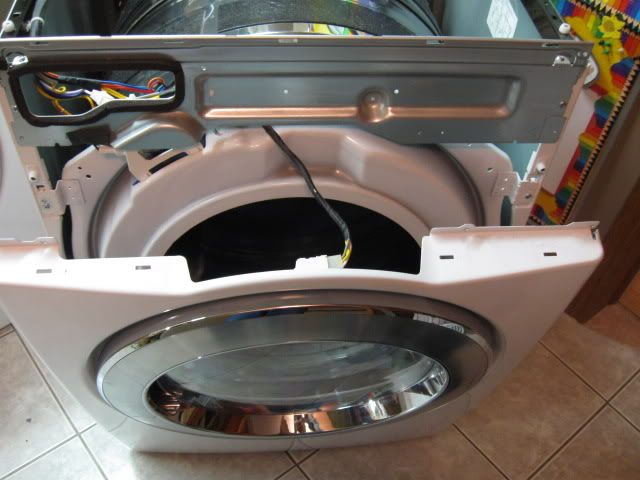 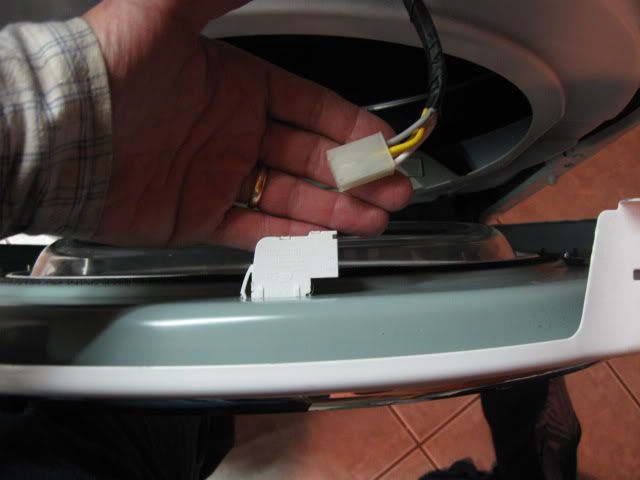 7. Tilt the front panel forward and remove door switch harness connector. Lift the front panel off and set it aside. 7. Tilt the front panel forward and remove door switch harness connector. Lift the front panel off and set it aside.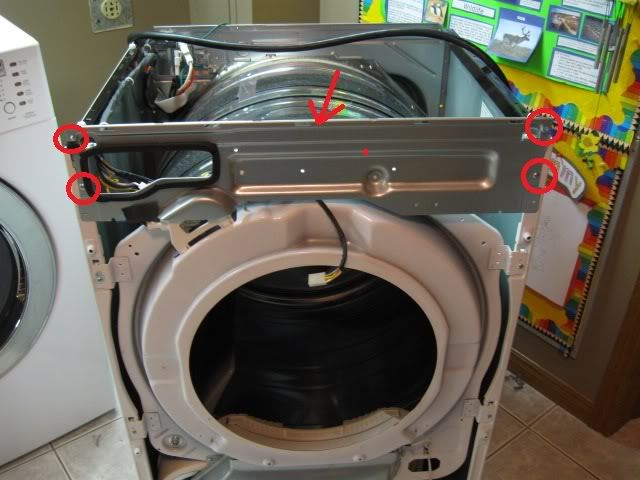 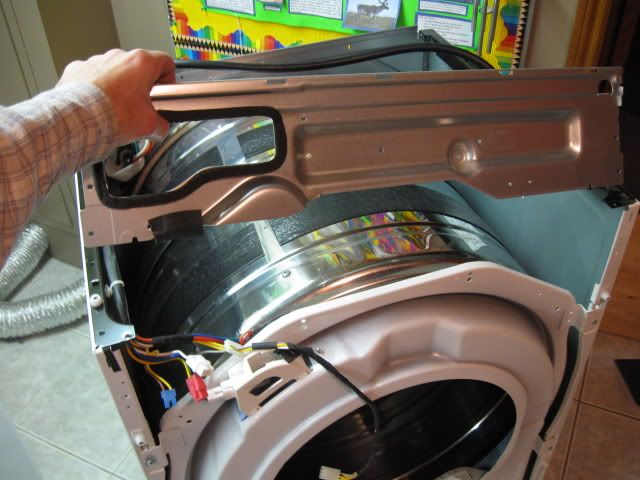 8. Remove four screws (circled in red) and set aside sheet metal part (red arrow). 8. Remove four screws (circled in red) and set aside sheet metal part (red arrow).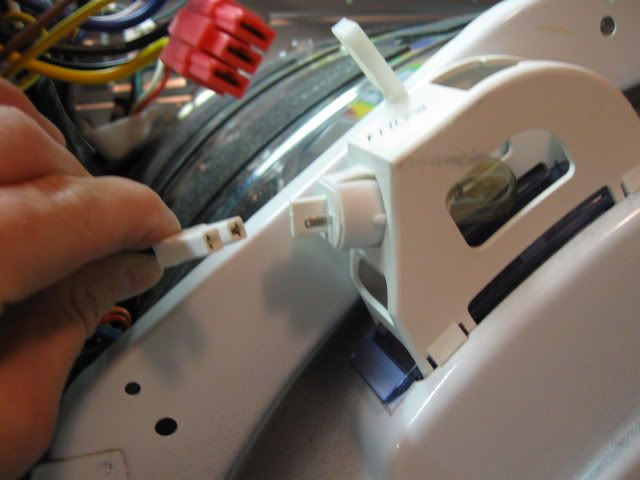 9. Pull the connector off of the light. There is no latch to squeeze on this connector. 9. Pull the connector off of the light. There is no latch to squeeze on this connector.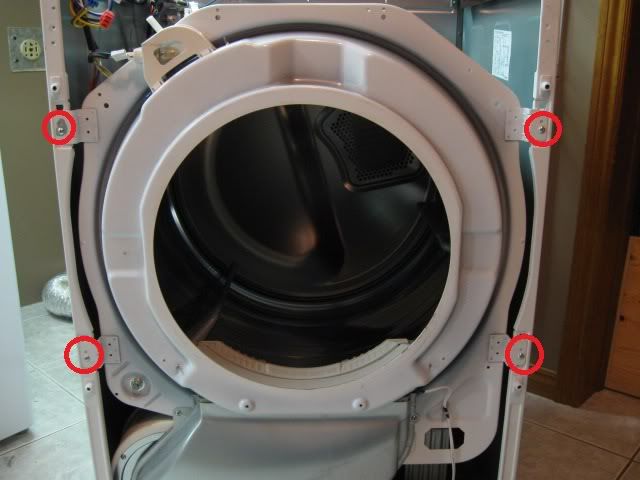 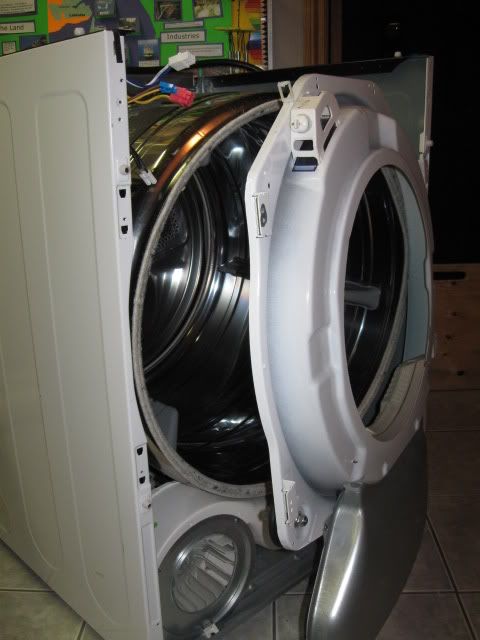 10. Remove 4 screws (circled in red), lift the front drum support up to disengage the locking tabs and rotate away from the dryer. 10. Remove 4 screws (circled in red), lift the front drum support up to disengage the locking tabs and rotate away from the dryer.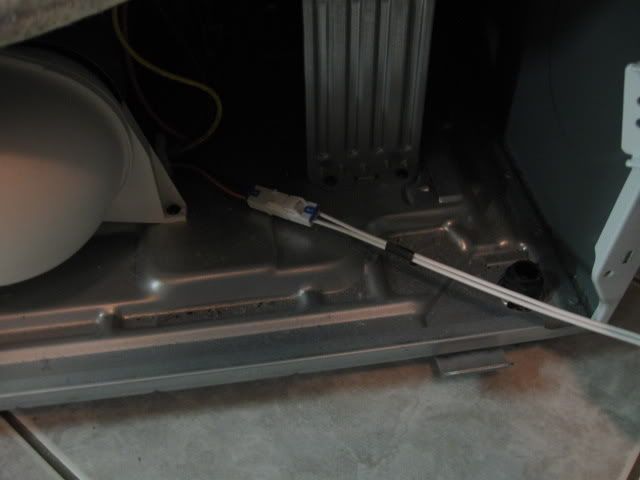 11. Disconnect the wiring harness connector at the base of the machine. Set the front drum support aside. 11. Disconnect the wiring harness connector at the base of the machine. Set the front drum support aside.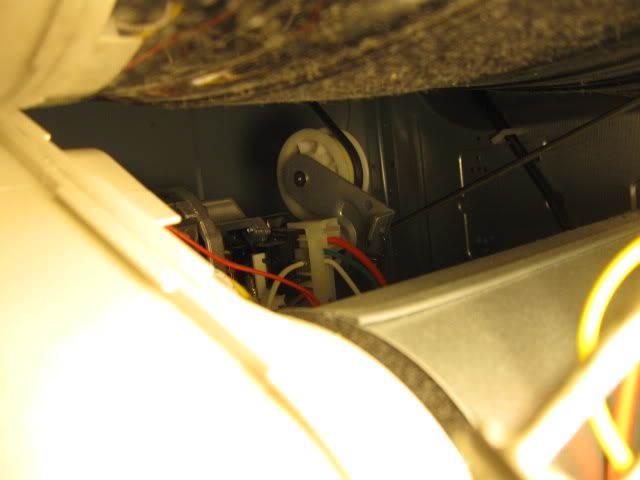 12. Make a mental note of how the belt is threaded around the tensioner and motor pulleys. You will need to remember this for when you re-install the belt. Note that the multi-v side of the belt is in contact with the motor pulley and the drum. The flat side of the belt is in contact with the tensioner pulley. Reach in, push the belt tensioner sideways and slide the belt off of the tensioner pulley and off of the motor drive pulley. 12. Make a mental note of how the belt is threaded around the tensioner and motor pulleys. You will need to remember this for when you re-install the belt. Note that the multi-v side of the belt is in contact with the motor pulley and the drum. The flat side of the belt is in contact with the tensioner pulley. Reach in, push the belt tensioner sideways and slide the belt off of the tensioner pulley and off of the motor drive pulley.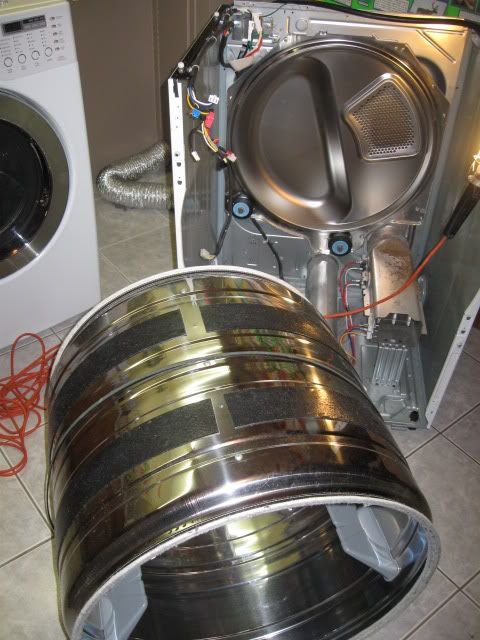 13. Lift the stainless steel drum out of the machine and set aside. 13. Lift the stainless steel drum out of the machine and set aside.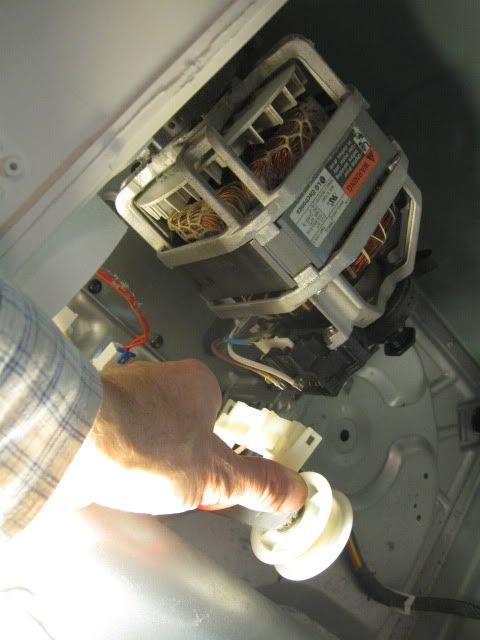 14. Disconnect the two wiring harness connectors to the motor. Squeeze both sides of the large connector to unlatch it. 14. Disconnect the two wiring harness connectors to the motor. Squeeze both sides of the large connector to unlatch it.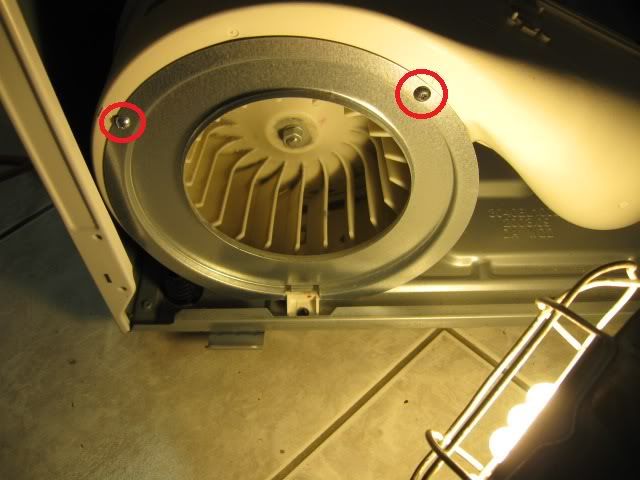 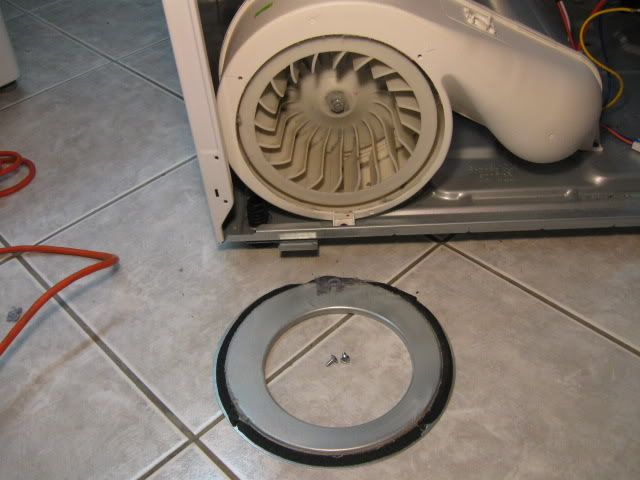 15. Remove the two screws (circled in red) and remove the blower cover. 15. Remove the two screws (circled in red) and remove the blower cover.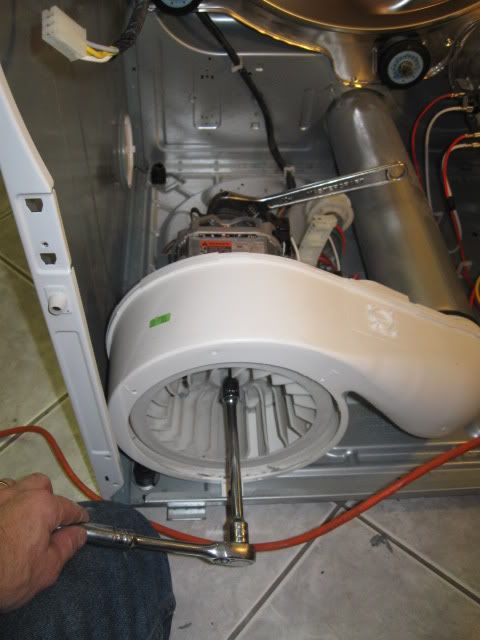 16. Remove the fan wheel by using a 13mm socket on the blower wheel bolt. Hold the shaft from turning with an adjustable wrench on the flats of the motor pulley. The bolt has a left hand thread. You will need to turn the bolt clockwise to remove it. Under the bolt and lock washer is a rectangular washer. Don’t worry if this falls off into the blower housing. You will be able to retrieve it later. 16. Remove the fan wheel by using a 13mm socket on the blower wheel bolt. Hold the shaft from turning with an adjustable wrench on the flats of the motor pulley. The bolt has a left hand thread. You will need to turn the bolt clockwise to remove it. Under the bolt and lock washer is a rectangular washer. Don’t worry if this falls off into the blower housing. You will be able to retrieve it later.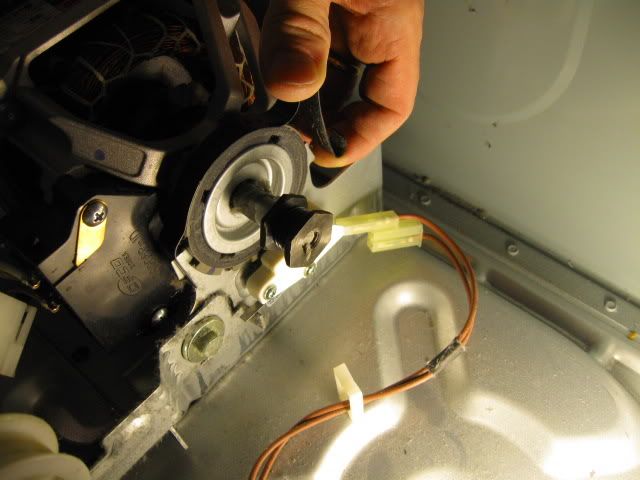 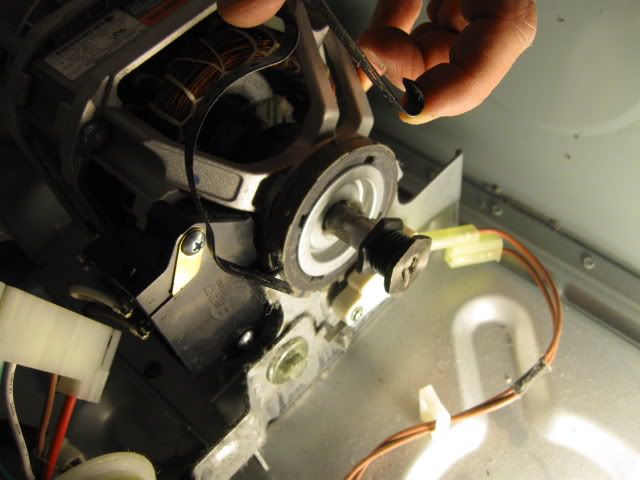 17. Remove the two spring clips holding the motor down by pushing down on the round part of the clip and then disengaging the clip from the sheet metal bracket. 17. Remove the two spring clips holding the motor down by pushing down on the round part of the clip and then disengaging the clip from the sheet metal bracket.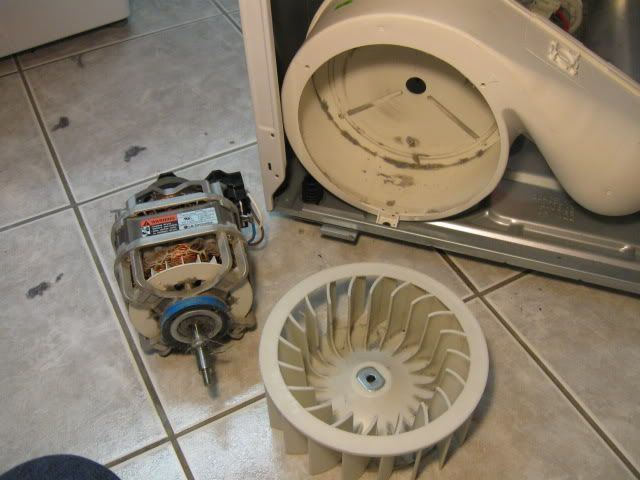 18. Remove the motor. The blower wheel should simply slide off of the motor shaft. Retrieve the rectangular washer and install in the blower wheel as shown.19. Use a vacuum and compressed air to remove all lint and clean up all of the dryer parts. Assembly is simply the reverse of the above steps. It is a bit tricky getting the multi-vee belt back on the pulleys, but with a bit of patience, it is not too bad.Discussion: 18. Remove the motor. The blower wheel should simply slide off of the motor shaft. Retrieve the rectangular washer and install in the blower wheel as shown.19. Use a vacuum and compressed air to remove all lint and clean up all of the dryer parts. Assembly is simply the reverse of the above steps. It is a bit tricky getting the multi-vee belt back on the pulleys, but with a bit of patience, it is not too bad.Discussion: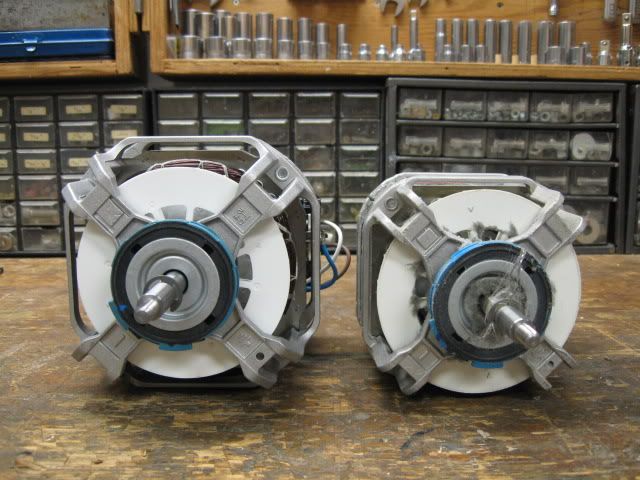 The new motor on the left (part no. 4681EL1008A) is significantly larger in diameter that the old motor on the right (part no is 4681EL1002A ), but don`t worry, it is completely interchangeable. Surprisingly, the new motor actually weighed 1.2 pounds less than the old motor! As a result, I suspect that the new motor has been redesigned with more torque than the old one.Reason for Motor Failure The new motor on the left (part no. 4681EL1008A) is significantly larger in diameter that the old motor on the right (part no is 4681EL1002A ), but don`t worry, it is completely interchangeable. Surprisingly, the new motor actually weighed 1.2 pounds less than the old motor! As a result, I suspect that the new motor has been redesigned with more torque than the old one.Reason for Motor Failure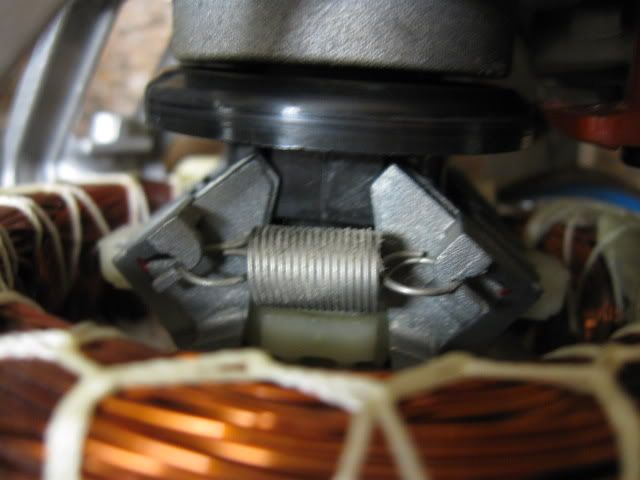 In this photo, you can see that the ends of the spring on the centrifugal switch is cutting into the aluminum retainers on both sides. The spring steel is much harder than the soft aluminum. As a result, each time the motor is turned on, the spring rubs on the aluminum and remove a small amount of aluminum. You can see that the left hand side of the spring has almost cut all of the way through the soft aluminum retainer. In this photo, you can see that the ends of the spring on the centrifugal switch is cutting into the aluminum retainers on both sides. The spring steel is much harder than the soft aluminum. As a result, each time the motor is turned on, the spring rubs on the aluminum and remove a small amount of aluminum. You can see that the left hand side of the spring has almost cut all of the way through the soft aluminum retainer.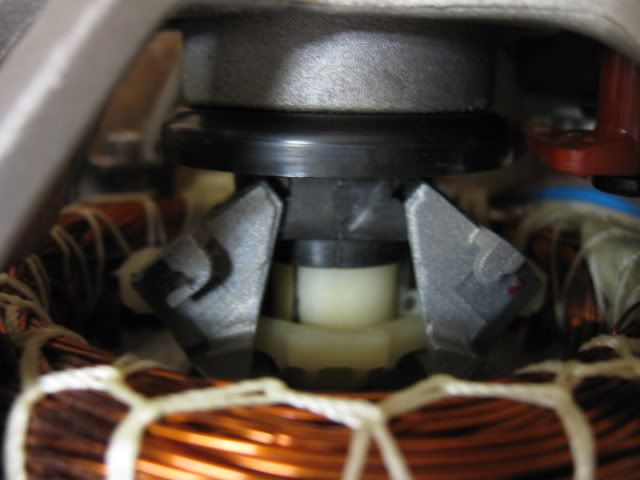 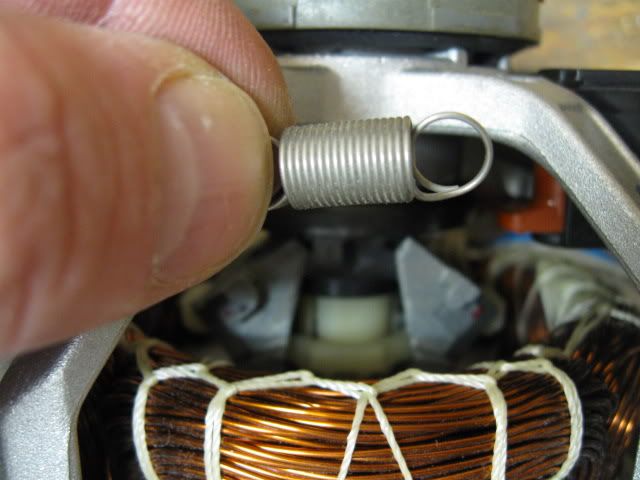 In the top photo, you can see that the right hand side of the spring has actually cut right through the aluminum retainer. The spring had actually fallen out of the motor. In the top photo, you can see that the right hand side of the spring has actually cut right through the aluminum retainer. The spring had actually fallen out of the motor.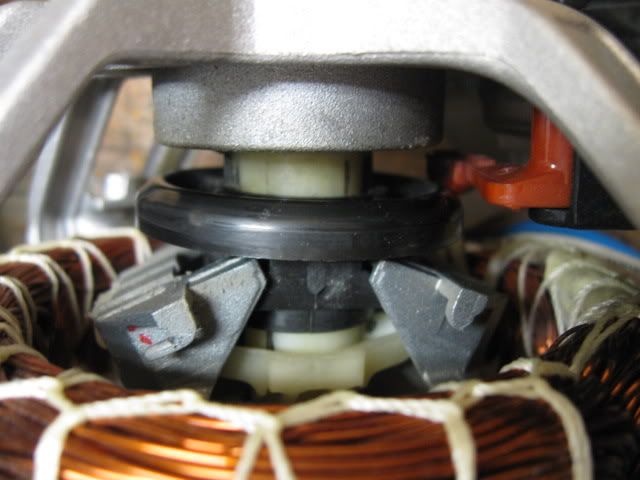 As a result of one spring missing, the centrifugal switch can get stuck in the “open” position as shown in the photo above. With one spring missing, there is not enough spring force to cause the ring to “snap” back. My theory is that this sometimes centrifugal switch got stuck, preventing power from getting to the starter winding and thus the motor would hum and the drum would not turn. As a result of one spring missing, the centrifugal switch can get stuck in the “open” position as shown in the photo above. With one spring missing, there is not enough spring force to cause the ring to “snap” back. My theory is that this sometimes centrifugal switch got stuck, preventing power from getting to the starter winding and thus the motor would hum and the drum would not turn.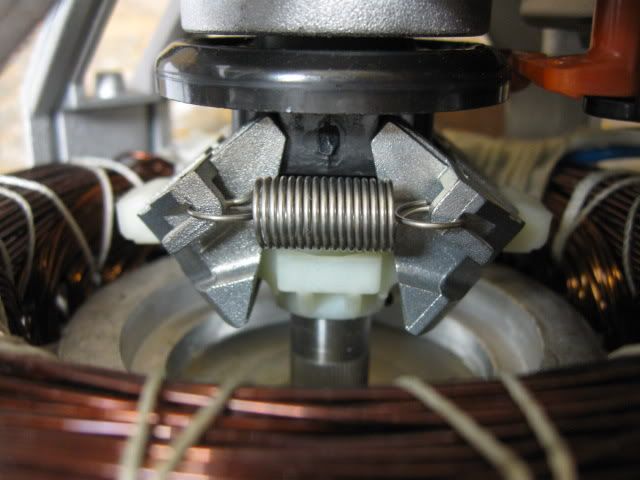 The centrifugal switch on the new motor has thicker aluminum retainers, so it should last much longer than the old motor. In my opinion, hardened steel pins would be much preferable, but probably would drive the cost of the motor up by a few $, so I am guessing that LG simply went with thicker retainers to improve the life of the motor with very little additional cost. Note that if your motor dies, I recommend upgrading to the new design. It appears to be more robust and may output more torque too. The centrifugal switch on the new motor has thicker aluminum retainers, so it should last much longer than the old motor. In my opinion, hardened steel pins would be much preferable, but probably would drive the cost of the motor up by a few $, so I am guessing that LG simply went with thicker retainers to improve the life of the motor with very little additional cost. Note that if your motor dies, I recommend upgrading to the new design. It appears to be more robust and may output more torque too.
|
|
|
|
|
|
Rank: Advanced Member
Groups: Senior Expert
Joined: 7/24/2007(UTC)
Posts: 2,277
|
Wow, that's awesome! Love the photos.
|
|
|
|
|
|
Rank: Member
Groups: Registered
Joined: 4/9/2011(UTC)
Posts: 1
|
that was perfect motor replacement discription. Mine did the exact thing. To temporarily put the dryer back into operation till the new motor came in I drilled two small holes in the ears where the spring wore through. The I cut the loop out of the spring and attached it to the centrufugal where the ear worn away. It looks like it could work for a long time but I will still replace it with the updated motor. The unit is only 4 years old, you would think it should last longer. I also had to replace the high heat thermostat.
|
|
|
|
|
|
Rank: Member
Groups: Registered
Joined: 5/26/2011(UTC)
Posts: 1
|
Thanks for the instructions! They are perfect! The photos are right on!
I have an LG TROMM DLE8377NM. A few of the screw positions were different, but nothing that anyone attempting this repair could not figure out.
I had the exact same symptoms you described above. I would push the start button and the dryer would hum. The drum would not spin.
With the help of the instructions above I was able to fully repair the dryer in about an hour not counting the time I took for my own engine repair described below!
I could start the drum by hand if I held the white button inside the dryer door in a closed position with my thumb while pushing the start button with my index finger. At the same time with my OTHER had I would spin the drum clockwise and it would begin spinning. I would quickly let go and slam the door shut and the drum would continue to turn. This is a real challenge with clothes in the dryer. This means the motor is good (windings and such) but the little starter mechanism (centrifugal switch) is shot as described in the directions above.
HERE IS MY TWIST TO THIS! Instead of replacing the whole motor, I found the two little metal pieces (aluminum retainers) and the two springs inside the dryer. I used my Dremel tool with a very small rotary rasp bit to cut slots in the left over metal just below where the old "pins" were on the retainer pieces. Basically, I made my own "holders" for the springs by cutting slots into the aluminum retainers.
I ordered, and had in my possession a new motor ready to be installed. As described above, the new aluminum retainers ARE more substantial. But once I saw how it all fit together, I figured I would try to save $120.00 and return the new motor after repairing the old one.
My repair worked and I saved the money. The repair has been working well over a week now with VERY heavy use. We have a large family and there was a lot of laundry backed up.
LEGAL NOTE - I chose to do this repair on my own. It was a challenge to see if I could do it, and it worked. You must decide for yourself. It is your choice. Don't blame me because you are an idiot and burn your house down, or anything else as such!
Good luck to all! Thanks again to the original author of the above repair!
|
|
|
|
|
|
Rank: Member
Groups: Registered
Joined: 6/25/2011(UTC)
Posts: 1
|
Any reason why you can't but the aluminum retainers and replace them does anybody know if you can, is there a place you can buy used motors for the parts. thank you
|
|
|
|
|
|
Rank: Member
Groups: Registered
Joined: 11/1/2011(UTC)
Posts: 1
|
In my case both springs broke off at the loop where they connect to the aluminun tangs. I had already bought the replacement motor so I went ahead with it. But if I had two springs of the right size and tension the old motor would be good to go again.
|
|
|
|
|
|
Rank: Member
Groups: Registered
Joined: 1/13/2012(UTC)
Posts: 1
|
These steps worked great. My husband sucked a sock into the motor, forgot to put the lint screen back. Only took 30 min to get the sock out using theses steps
|
|
|
|
|
|
Rank: Member
Groups: Registered
Joined: 12/16/2010(UTC)
Posts: 12
|
Originally Posted by: penncross  that was perfect motor replacement discription. Mine did the exact thing. To temporarily put the dryer back into operation till the new motor came in I drilled two small holes in the ears where the spring wore through. The I cut the loop out of the spring and attached it to the centrufugal where the ear worn away. It looks like it could work for a long time but I will still replace it with the updated motor. The unit is only 4 years old, you would think it should last longer. I also had to replace the high heat thermostat. I like your idea of drilling the holes and re-attaching the spring! It is interesting that you only got 4 years out of your dryer motor - it is clearly a poor design. The good news is that the replacement motor is quite reasonable in price.
|
|
|
|
|
|
Rank: Member
Groups: Registered
Joined: 12/16/2010(UTC)
Posts: 12
|
Originally Posted by: rpier2 Thanks for the instructions! They are perfect! The photos are right on!
I have an LG TROMM DLE8377NM. A few of the screw positions were different, but nothing that anyone attempting this repair could not figure out.
I had the exact same symptoms you described above. I would push the start button and the dryer would hum. The drum would not spin.
With the help of the instructions above I was able to fully repair the dryer in about an hour not counting the time I took for my own engine repair described below!
I could start the drum by hand if I held the white button inside the dryer door in a closed position with my thumb while pushing the start button with my index finger. At the same time with my OTHER had I would spin the drum clockwise and it would begin spinning. I would quickly let go and slam the door shut and the drum would continue to turn. This is a real challenge with clothes in the dryer. This means the motor is good (windings and such) but the little starter mechanism (centrifugal switch) is shot as described in the directions above.
HERE IS MY TWIST TO THIS! Instead of replacing the whole motor, I found the two little metal pieces (aluminum retainers) and the two springs inside the dryer. I used my Dremel tool with a very small rotary rasp bit to cut slots in the left over metal just below where the old "pins" were on the retainer pieces. Basically, I made my own "holders" for the springs by cutting slots into the aluminum retainers.
I ordered, and had in my possession a new motor ready to be installed. As described above, the new aluminum retainers ARE more substantial. But once I saw how it all fit together, I figured I would try to save $120.00 and return the new motor after repairing the old one.
My repair worked and I saved the money. The repair has been working well over a week now with VERY heavy use. We have a large family and there was a lot of laundry backed up.
LEGAL NOTE - I chose to do this repair on my own. It was a challenge to see if I could do it, and it worked. You must decide for yourself. It is your choice. Don't blame me because you are an idiot and burn your house down, or anything else as such!
Good luck to all! Thanks again to the original author of the above repair! Your welcome! Great idea to repair your motor. When the springs wear through again, make sure you come back to the forum and let us know how many years you got out of it. That would be very interesting to know.
|
|
|
|
|
|
Rank: Member
Groups: Registered
Joined: 12/16/2010(UTC)
Posts: 12
|
Originally Posted by: Christypace These steps worked great. My husband sucked a sock into the motor, forgot to put the lint screen back. Only took 30 min to get the sock out using theses steps Good to hear that the procedure helped out another person. No need to spend a lot of money when you can do it yourself!;)
|
|
|
|
|
|
Forum Jump
You can post new topics in this forum.
You can reply to topics in this forum.
You can delete your posts in this forum.
You can edit your posts in this forum.
You cannot create polls in this forum.
You can vote in polls in this forum.
Important Information:
The AppliancePartsPros.com uses cookies. By continuing to browse this site, you are agreeing to our use of cookies.
More Details
Close